
eRoad HR as Identity Source
This guide explains how to configure the eRoad HR system as an identity source in IDaaS, synchronizing organizational and user data maintained in eRoad HR into the IDaaS platform in real time to ensure real-time synchronization and data consistency across enterprise application systems.
Prerequisites
- Administrator permissions for the eRoad HR open platform.
- Administrator permissions for the IDaaS Enterprise Center.
Configuration Flow

Procedure
Obtain Parameters from eRoad HR
- In the eRoad HR open platform, create an enterprise application. For details, refer to the platform documentation.
- Obtain the application ID, application secret, and other related parameters of the self-built application.
- Grant users access to the newly created application.
Configure the eRoad HR Identity Source in IDaaS
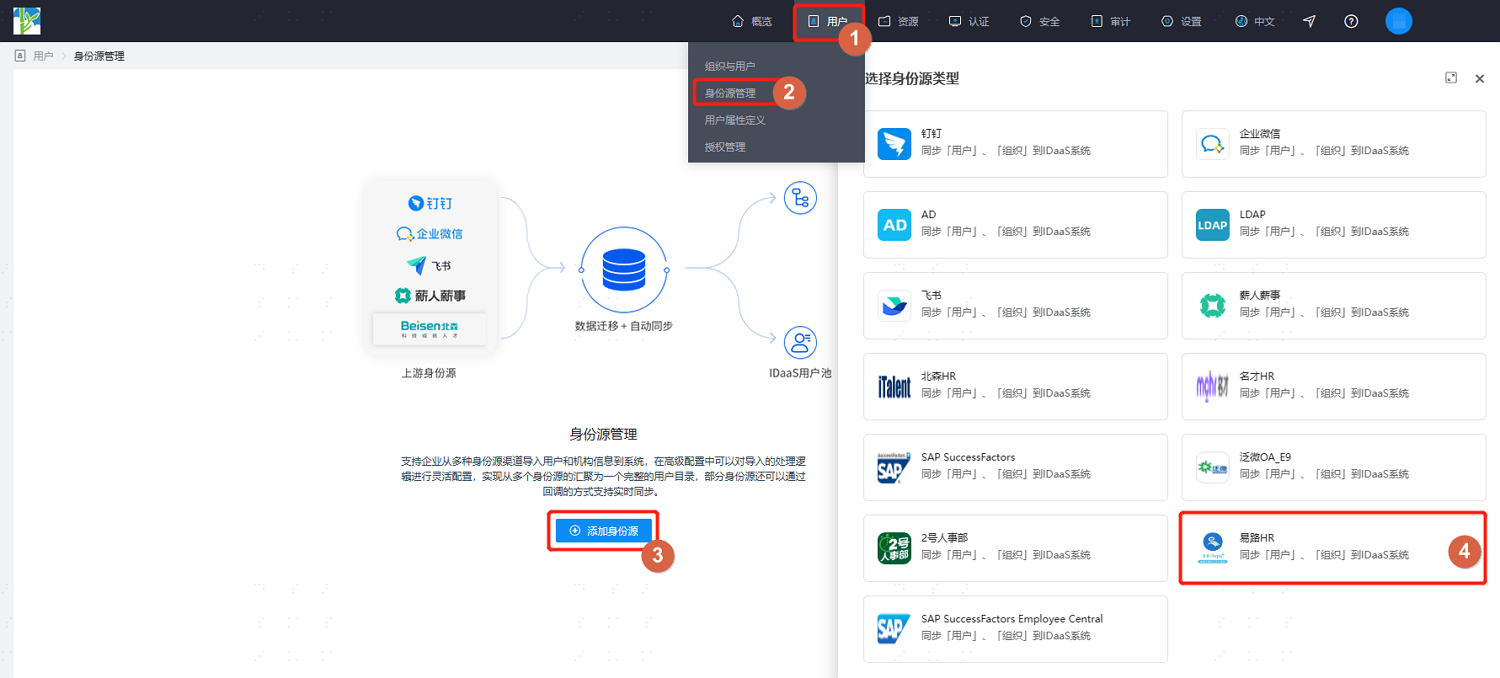
Log in to the IDaaS Enterprise Center, choose Users > Identity Source Management from the top navigation bar, click Add Identity Source, and select eRoad HR.
Customize the identity source name, fill in the application ID, secret, server address, and other parameters as prompted, then click OK to save.
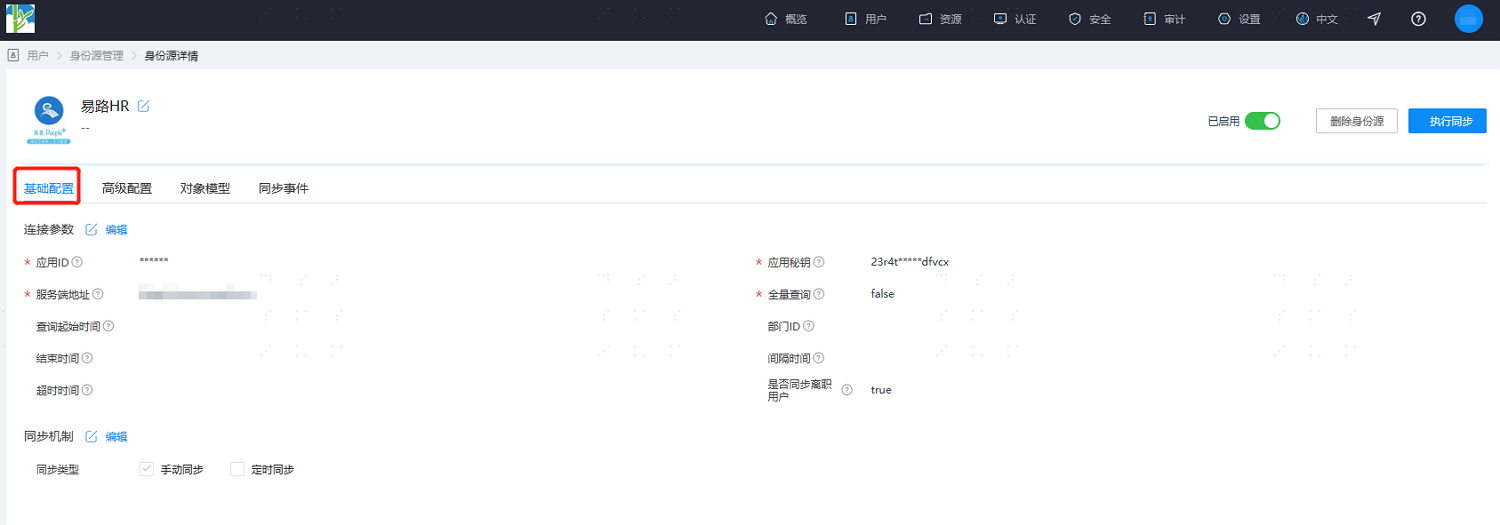
Enter the detail page of the newly created identity source to view or update the Basic Configuration, including connection parameters and synchronization mechanism.
Switch to the Advanced Configuration tab. It is recommended to keep the default values or adjust them according to actual requirements.
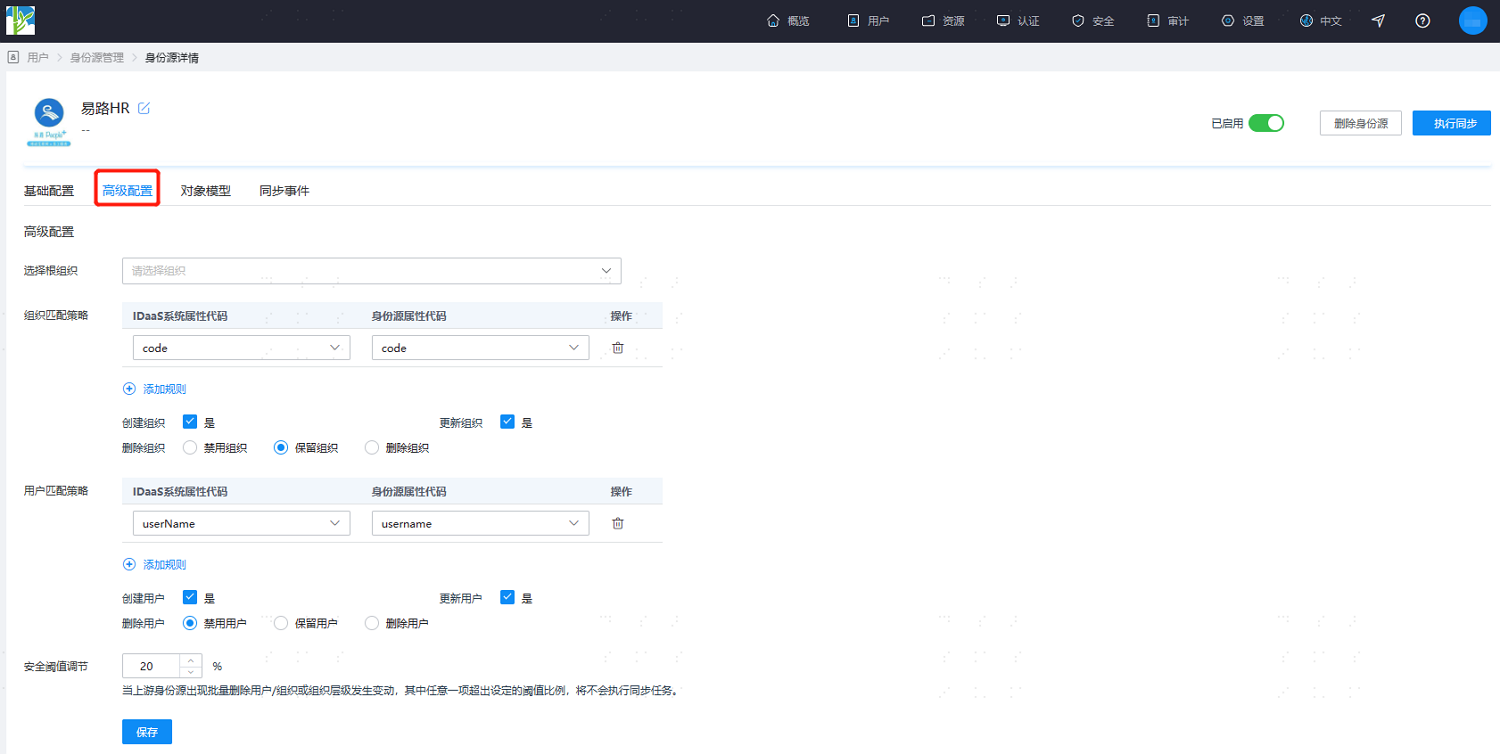
Parameter Description Select Root Organization Select an organization node in IDaaS as the root node for the synchronized eRoad HR organizations. Organization Matching Policy By default, IDaaS organization codes are associated with eRoad HR institution codes. Create Organization Default is Yes. Update Organization Default is Yes. Delete Organization By default, organizations are retained (i.e., when an organization is deleted in eRoad HR, it is retained in IDaaS). You can also disable or delete organizations. User Matching Policy By default, IDaaS user mobile numbers and usernames are associated with eRoad HR user mobile numbers and usernames. Create User Default is Yes. Update User Default is Yes. Delete User By default, users are disabled (i.e., when a user is deleted in eRoad HR, the user is disabled in IDaaS). You can also retain or delete users. Safety Threshold Adjustment Sets the maximum threshold ratio for changes such as deleting users, deleting organizations, or changing organization hierarchy in the upstream identity source.
Threshold = (Difference between platform-recovered data and this recovery / Recovered data) × 100%. If the upstream identity source disables or deletes data exceeding the threshold, the platform will not perform the disable or delete operation.After configuration, switch to the Object Model tab, select Mapping Definition, and configure the mapping definitions as follows.
The object model supports mapping attributes of users and organizations from the eRoad HR identity source to IDaaS user and organization attributes. After configuration, user and organization attributes are recovered from eRoad HR into IDaaS.
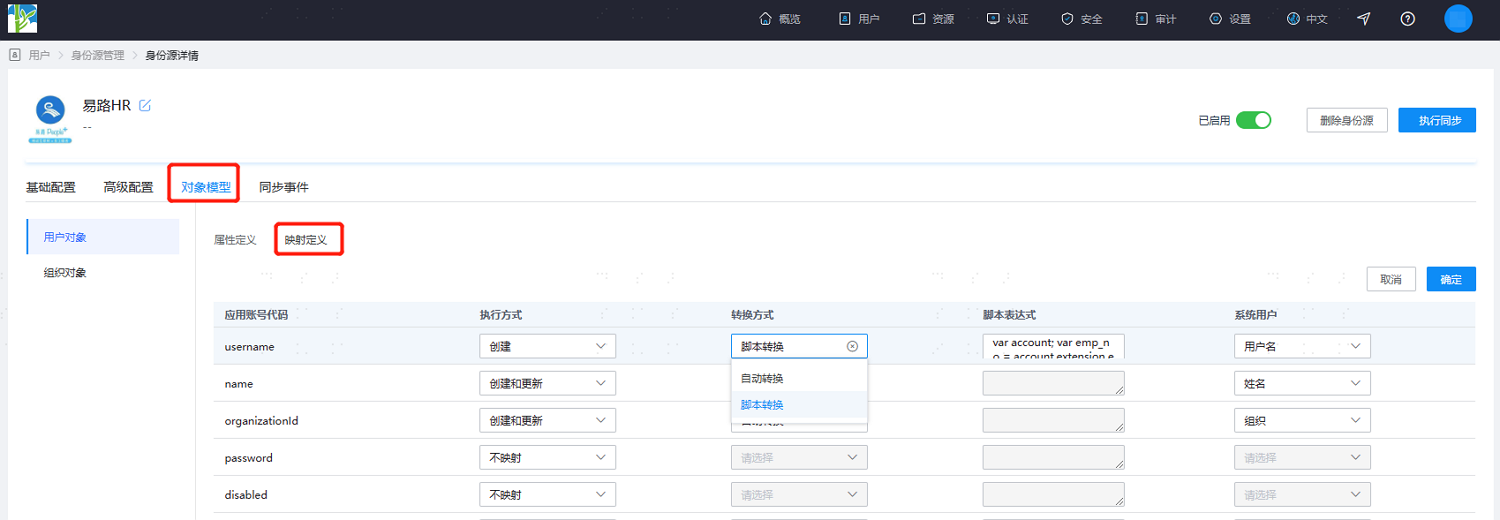
- Execution Mode: Sets when the attribute needs to be mapped.
- Do Not Map: The attribute will not be synchronized to IDaaS.
- Create: The attribute is synchronized only during creation.
- Update: The attribute is synchronized only during update.
- Create and Update: The attribute is synchronized during both creation and update.
- Transformation Mode: Sets how the attribute is mapped.
- Auto Transform: Synchronize the value as-is from the identity source.
- Script Transform: Use this when the value from the identity source does not meet the required format. Refer to Script Mapping Methods.
- Execution Mode: Sets when the attribute needs to be mapped.
eRoad HR Data Recovery Scenarios:
TIP
When the existing data volume in eRoad HR is large, data recovery may time out and needs to be performed in batches. Configure according to the actual project situation as described in the following scenarios.
Scenario 1: Existing Data Recovery: The system has existing data and the user data volume exceeds 10,000. You need to perform recovery according to the existing data recovery scenario first, then switch to incremental data recovery after completion.
- Configure the application ID, application secret, and server address.
- Set Full Query Configuration to
false. - Set the query start time (based on the eRoad HR launch time).
- Set the end time. The interval between start and end time can be 2 months to 1 year.
- Set the timeout to
500. - Set whether to synchronize resigned users according to business requirements.
truemeans recover,falsemeans do not recover. - Save the import configuration.
- Click Execute Synchronization.
- After synchronization is complete, change the query start time to the previous end time, and change the end time to 2 months to 1 year later.
- Repeat the above steps until all existing data is recovered.
Scenario 2: Incremental Data Recovery: The system has no existing data and the user data volume exceeds 10,000. Configure incremental recovery.
- Configure the application ID, application secret, and server address.
- Set Full Query Configuration to
false. - Leave the query start time empty.
- Leave the query end time empty.
- Set the interval to
1. - Set the timeout to
10. If timeout occurs during recovery, increase the timeout appropriately. - Set whether to synchronize resigned users according to business requirements.
truemeans recover,falsemeans do not recover.
Scenario 3: Specified Department Data Recovery: Recover only users under specified departments.
- Configure the application ID, application secret, and server address.
- Set Full Query Configuration to
false. - Set the department ID. After configuration, the department and its sub-departments will be recovered.
- Set the interval to
1. - Set the timeout to
10. If timeout occurs during recovery, increase the timeout appropriately. - Set whether to synchronize resigned users according to business requirements.
truemeans recover,falsemeans do not recover. - Set the synchronization mechanism to scheduled synchronization in the basic configuration.
Scenario 4: Full Data Recovery: If the system has fewer than 10,000 users, it is recommended to configure full recovery. You can also configure according to Scenario 1.
- Configure the application ID, application secret, and server address.
- Set Full Query Configuration to
true. - Set the timeout according to the data volume.
- Set whether to synchronize resigned users according to business requirements.
truemeans recover,falsemeans not recover. - Set the synchronization mechanism to scheduled synchronization in the basic configuration.
TIP
If a recovery event is interrupted, it indicates the timeout is too short. Increase the timeout.
After configuration, click Execute Synchronization to run the synchronization immediately.
TIP
If the synchronization mechanism in the basic configuration is set to scheduled synchronization, there is no need to manually execute the synchronization task here.
After execution, switch to the Synchronization Events page to view all synchronization tasks for this identity source. Click Details under the Operation column to view the import results, or go to the Users > Users and Organizations page to view the imported data.