
Identity Source Cloud Bridge
Overview
The identity-source type Cloud Bridge is a type of IDaaS Cloud Bridge. It is used to establish a connection channel between BambooCloud IDaaS and the corresponding internal enterprise identity source. Currently, AD identity source is supported.
This chapter guides you through deploying and using the Identity Source Cloud Bridge Agent on the IDaaS platform, and provides update records for the Identity Source Cloud Bridge installation package so you can choose the appropriate version according to project requirements. The following uses CentOS Linux release 8.0.1905 as an example for deploying the Identity Source Cloud Bridge Agent.
Prerequisites
You have administrator permissions for the IDaaS Enterprise Center platform.
You have internal network server operation permissions.
The server has net-tools, curl, JDK (OpenJDK 17 or later), and rng-tools installed. Installation steps are as follows:
net-tools Installation
Verify whether net-tools is installed.
rpm -q net-toolsIf it is not installed, download the installation package and upload it to the internal network server.
Enter the directory where the file is located and run the installation command.
yum -y install net-tools-2.0-0.22.20131004git.el7.x86_64.rpmVerify the installation.
rpm -q net-tools
curl Installation
Most Linux distributions include curl by default. Verify whether it is installed.
curl --version
JDK Installation
Download the installation package and upload it to the internal network server.
Enter the directory where the file is located and run the installation command.
yum -y install jdk-17.0.13_linux-x64_bin.rpmVerify the installation.
java -version
rng-tools Installation
Install the rng-tools utility to increase the system entropy pool replenishment rate. Run the following command to install rng-tools:
yum install rng-toolsCheck whether the rngd configuration file exists:
cat /etc/sysconfig/rngdIf the file does not exist or is empty, run the following command to create it:
echo "OPTIONS=\"-r /dev/urandom\"" > /etc/sysconfig/rngdRun the following commands to start the rng service and check its status.
service rngd start   Start the rng service
service rngd status   Check the rng service status
If the status is enabled, the service started successfully:

Pre-Deployment Preparation
Software Package
Please prepare the following software packages in advance.
| Package Name | Description | Download Link |
|---|---|---|
| cloudAgent-identitySource-{version}.zip | Identity Source Cloud Bridge installation package. | Download |
| cloudAgent-identitySource-{version}.zip.sha256 | SHA256 checksum file for the Identity Source Cloud Bridge installation package, used to verify package integrity. | Download |
The files extracted from the Identity Source Cloud Bridge installation package are as follows:
| Name | Description |
|---|---|
| agent.sh | File used to configure the Cloud Bridge Agent to start automatically on boot. |
| cloudAgent-identitySource.jar | Deployment package of the Identity Source Cloud Bridge Agent. |
| cloudBridge.sh | File used to start the Cloud Bridge Agent manually. |
| config | Directory for storing Cloud Bridge Agent configuration files (application.yml). |
| log | Directory for storing Cloud Bridge Agent logs (agent.log). |
| connector | Directory for storing Identity Source Cloud Bridge connector JAR packages. |
| encrypt.sh | Encryption script. |
Deploying the Identity Source Cloud Bridge
Log in to the IDaaS Enterprise Center platform. In the top navigation bar, choose Settings > Cloud Bridge Configuration, click Add Cloud Bridge Agent, set a name, and select the identity-source type Cloud Bridge.
TIP
- After the Cloud Bridge Agent is added, the system automatically generates a ClientID and ClientSecret. Please keep them safe.
- If you forget the ClientSecret, click Reset Secret for the target Agent to regenerate it. After reset, the original secret becomes invalid. Please proceed with caution.
- You can view Cloud Bridge connection logs and service logs.
- You can configure an IP address for the Cloud Bridge Agent. Set it to the egress IP of the server where the Cloud Bridge Agent is deployed. After configuration, only that IP is allowed to connect to the IDaaS cloud service, ensuring service security.
- You can delete the target Agent. Please proceed with caution.
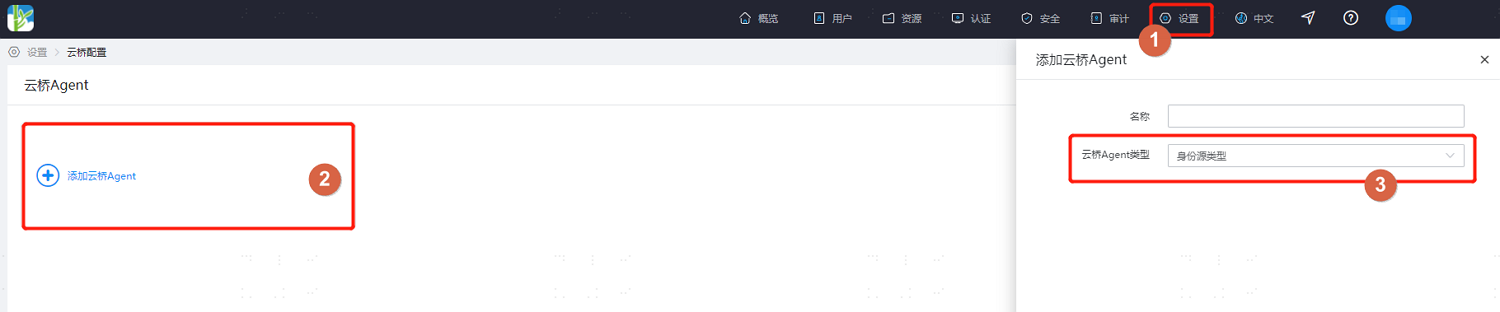
Upload all software packages obtained for the Identity Source Cloud Bridge to the target server, and run the following command to verify the integrity of the Cloud Bridge installation package. When the output shows OK, the integrity verification is successful.
sha256sum -c cloudAgent-identitySource-{version}.zip.sha256Run the following command to extract the Identity Source Cloud Bridge installation package. The extraction destination must be unique; otherwise, installation errors will occur.
unzip -od {extraction-directory} cloudAgent-identitySource-{version}.zipEnter the extracted directory and configure the
application.ymlfile in the config directory.###UTF-8格式YAML配置标识头,勿删除### server: # 云桥启动端口 port: 9081 agent: # 云桥服务地址。domain为在IDaaS的租户域名xx.bccastle.com 示例:serverAddress: wss://domain/api/v1/ws # 云桥ClientID。在IDaaS创建的云桥的ClientID 示例:agentId: 7jve68NZlPFqyWD8SJToWxTU5Wg6khk1 # 云桥ClientSecret。在IDaaS创建的云桥的ClientSecret 示例:agentSecret: LdfwryojYHLMaeNGVdr9fSh1iwyDCL0QuBxhKn0jxT5UOhUQVpAoGdglsvtpLNV1 # 身份源回收属性 idsource: recycle: # AD身份源回收属性 ad: # AD服务器的主机名或IP地 示例:host: 127.0.0.1 # 用于与AD服务器通信的TCP/IP端口 示例:port: 8080 # 选中此复选框可使用SSL连接到AD服务器 示例:ssl: false # 默认情况下使用TLSv1.2,建议使用TLSV 1.3和TLSv1.2(为了兼容性,可以使用SSL和TLSv1.0)。 示例:protocolVersion: TLSv1.2 # 用于AD服务器身份验证的标识符 示例:principal: DEMO-TEST\Administrator # 主体的密码 示例:credentials: passw0rd # 基本上下文(搜索AD树时将使用的AD树中的一个或多个起点,当从AD服务器找到用户或用户所属的组时,将执行搜索) 示例:baseContexts: OU=org-test,DC=demo-test,DC=com # 映射到UID属性的AD属性的名称。默认值:objectGUID 示例:uidAttribute: objectGUID # 输入多个对象类,每个条目都应有自己的行;请勿使用逗号或分号分隔多个对象类;某些对象类可能需要指定类层次结构中的所有对象类。默认值:organizationalUnit 示例:organizationObjectClasses: organizationalUnit # 输入多个对象类,每个条目应有自己的行;请勿使用逗号或分号分隔多个对象类;某些对象类可能需要指定类层次结构中的所有对象类。默认值:top, person, organizationalPerson, user 示例:accountObjectClasses: user # 使用VLV控件,默认值:true 示例:useVlvControls: true # 指定用于资源上VLV索引的排序属性。默认值:objectGUID 示例:vlvSortAttribute: objectGUID # This is the Agent log level control configuration logging: level: com.bamboocloud.bcidaas.cloudbridge: INFO file: # The value of the attribute must have a unit, which can be KB or MB # 单个日志文件大小。默认值10MB,最大值10MB # default: 10MB # max-size: 10MB # The maximum number of days that log files are to be archived # 日志最长保留时间。默认值7天,最大值7天 # default: 7 DAYS # max-history: 7After the configuration file is complete, run the following command in the extracted Cloud Bridge installation directory to start the Cloud Bridge. When the message Starting Agent Success appears, the Cloud Bridge started successfully. If startup fails, check the configuration file.
./cloudBridge.sh start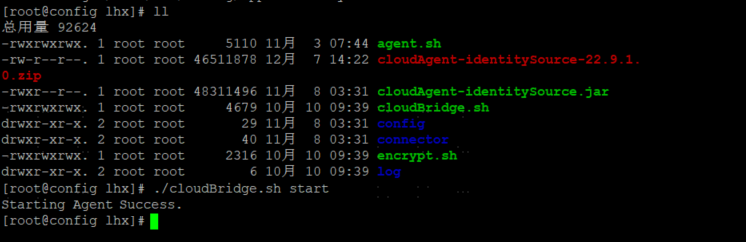
(Optional) If you want the Cloud Bridge to start automatically on boot, run the following command in the extracted Cloud Bridge installation directory. When the message The Agent service installed successfully, need to reboot will take effect appears, the operation succeeded.
./agent.sh install(Optional) If you want to disable automatic startup of the Cloud Bridge, run the following command in the extracted Cloud Bridge installation directory. When the message uninstall Agent Success appears, automatic startup has been disabled successfully.
./agent.sh uninstallYou can obtain log information from the
log/agent.logfile in the directory.
Using the Identity Source Cloud Bridge
Log in to the IDaaS Enterprise Center platform. In the top navigation bar, choose Users > Identity Source Management, and select AD Identity Source to add it.
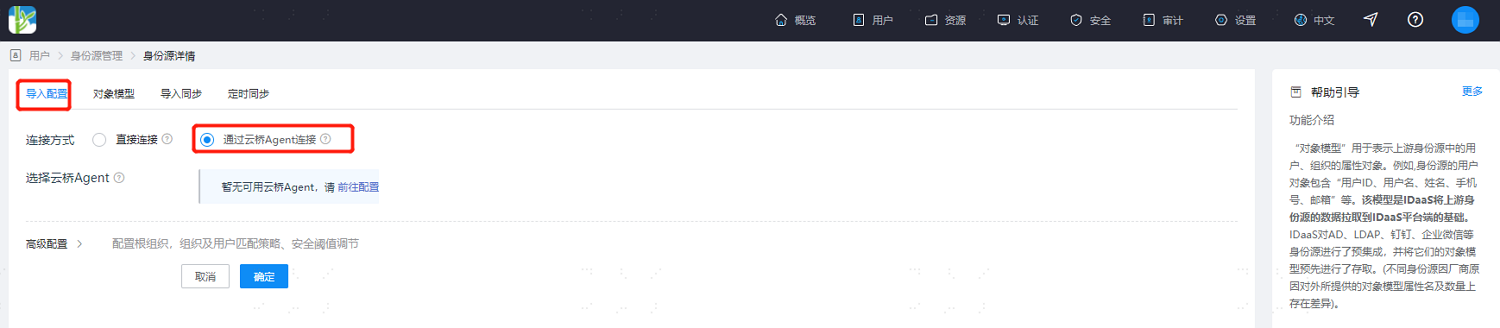
On the Import Configuration page, set the connection method to Connect via Cloud Bridge Agent, select an available Identity Source Cloud Bridge, and refer to AD as Identity Source for the remaining configuration.
Appendix: Encryption Tool Usage
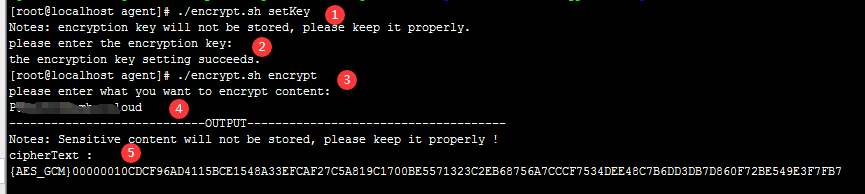
Run the
./encrypt.sh setKeycommand, press Enter, and then set the encryption key.TIP
If an encryption key has already been set and you need to update it, run the
./encrypt.sh updateKeycommand.Customize the AD encryption key.
Run the
./encrypt.sh encryptcommand.Enter the AD administrator password.
Copy the generated encrypted password and enter it after
credentialsin the application.yml configuration file, as shown below:credentials: 'encrypted-password'
Changelog
This section shows update records for the Identity Source Cloud Bridge Agent installation package.
| Version | Update Description |
|---|---|
| V25.2.1.1 | Third-party component upgrade; security vulnerabilities fixed |
| V25.2.1.0 | Spring version upgrade; security vulnerabilities fixed |
| V24.11.1.0 | Third-party component upgrade; security vulnerabilities fixed |
| V24.8.2.0 | Cloud Bridge client security hardening |
| V24.4.1.0 | Cloud Bridge client security hardening |
| V23.10.1.0 | JDK version upgraded to JDK 17 |
| V23.5.1.0 | Added client connection information and log backup |
| V23.4.1.0 | 1. Updated AD connector and optimized error messages 2. Added test functionality for Cloud Bridge AD configuration |
| V22.11.1.0 | 1. Optimized some known bugs 2. Optimized WebSocket connection |
| V22.9.1.0 | 1. Modified Cloud Bridge installation script to install watchdog via systemd, supporting Ubuntu 2. Added pre-installation environment checks to the installation script |
| V22.7.1.0 | Supports viewing Cloud Bridge service logs |
| V22.3.1.0 | Optimized AD identity source Agent functionality |
| V21.10.2.0 | 1. More precise configuration error messages 2. Optimized Agent PID retrieval |
| V21.9.2.0 | Added watchdog mechanism |
| V21.9.1.0 | 1. Optimized Cloud Bridge reconnection mechanism 2. Optimized some known bugs |