Assign Application Access Accounts to Users
This feature manages the binding relationship between "IDaaS-side users" and "application-side accounts". That is, for one IDaaS user, which application accounts exist in different application systems, and supports assigning multiple application accounts to one user.
There are two forms of application account assignment: assign a new account to a user, and bind an existing account to a user so the account becomes normally usable.
- "New account" can be understood as "activation". It represents opening application access from IDaaS for one or more users and assigning them application accounts. You can manually assign application accounts to one or more users, or use automatic authorization policies to open application accounts for all users, or set authorization policies based on organization, user group, and other conditions to automatically assign application accounts to users who meet the conditions.
- Existing accounts are a batch of historical accounts offline in the system. After sorting out the relationship between IDaaS users and application-side accounts offline, you can batch import application accounts into IDaaS. After import, since they are not associated with users, such accounts are called orphan accounts. Binding these existing accounts with system users allows users to access applications with the corresponding accounts.
Prerequisites
- You have administrator permissions for the IDaaS enterprise center platform.
- The application has been integrated into the IDaaS platform.
Procedure
Manually Assign Application Accounts
Authorize from the User Perspective
Log in to the IDaaS enterprise center platform. In the top navigation bar, select "Users > Organization and Users". Hover over the user to whom you want to authorize an application account, and click "Application Authorization" to enter the user details page.

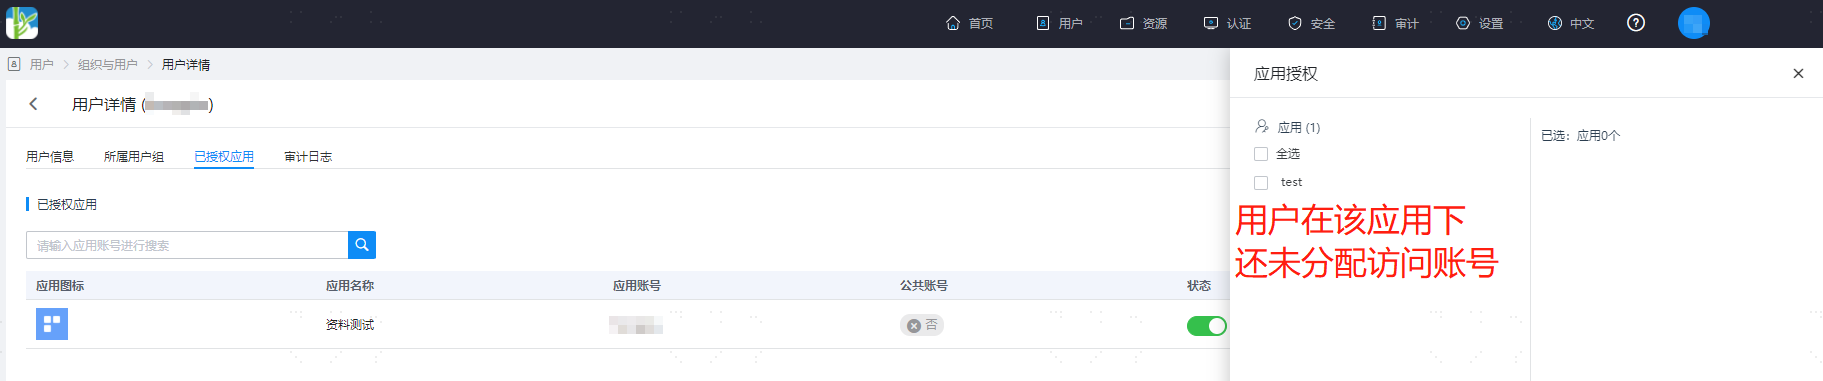
The user details page displays all applications already authorized to the user, meaning the user has been assigned access accounts under these applications. Click "Application Authorization" to authorize the required application access accounts for the selected user.
Authorize from the Application Perspective
Because self-built applications and pre-integrated applications have different interfaces, the procedures are described separately below.
Add User Accounts for Pre-integrated Applications
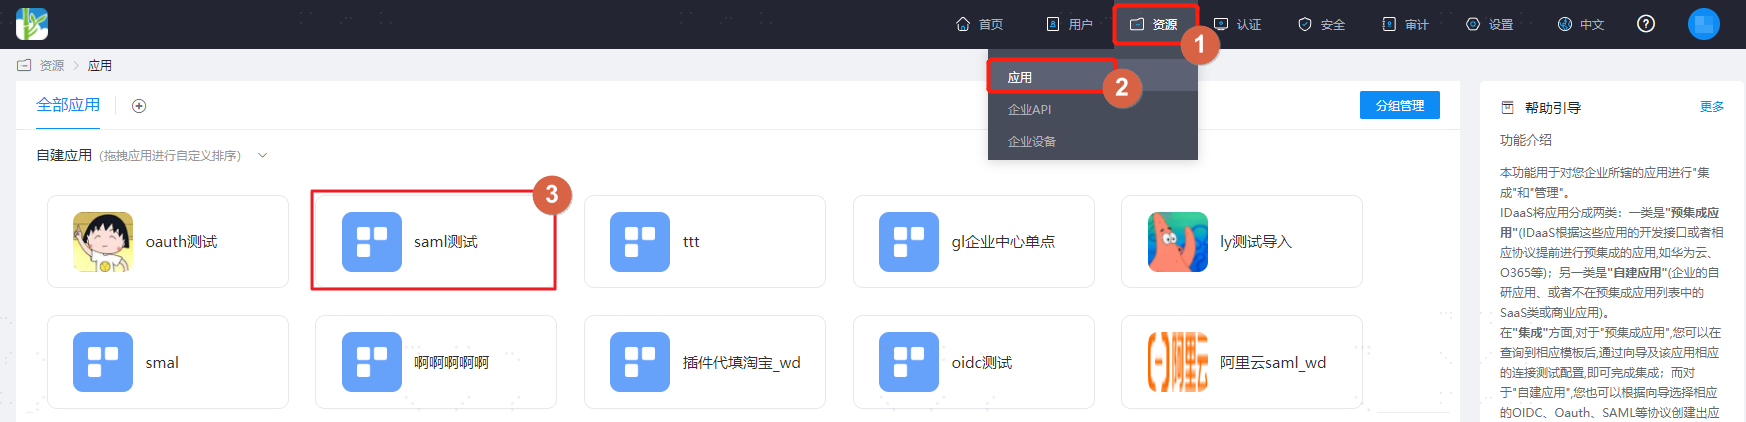
Log in to the IDaaS enterprise center platform. In the top navigation bar, select "Resources > Applications". Under the pre-integrated application category, find the application to which you want to authorize accounts, and click to enter it.
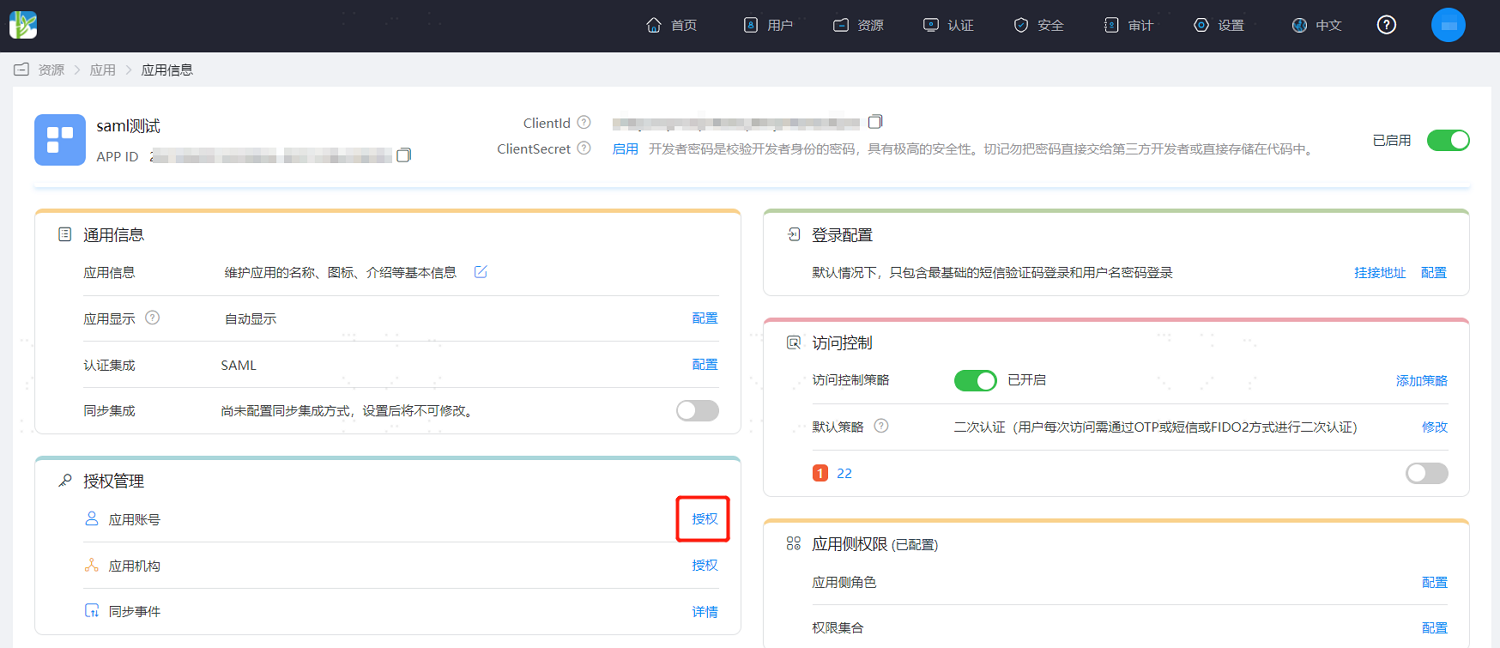
Find "Authorization Management", click "Authorize" after Application Account to enter the application account page. The page displays all accessible accounts under this application. Accounts are associated with users, and users can access the application with these accounts.
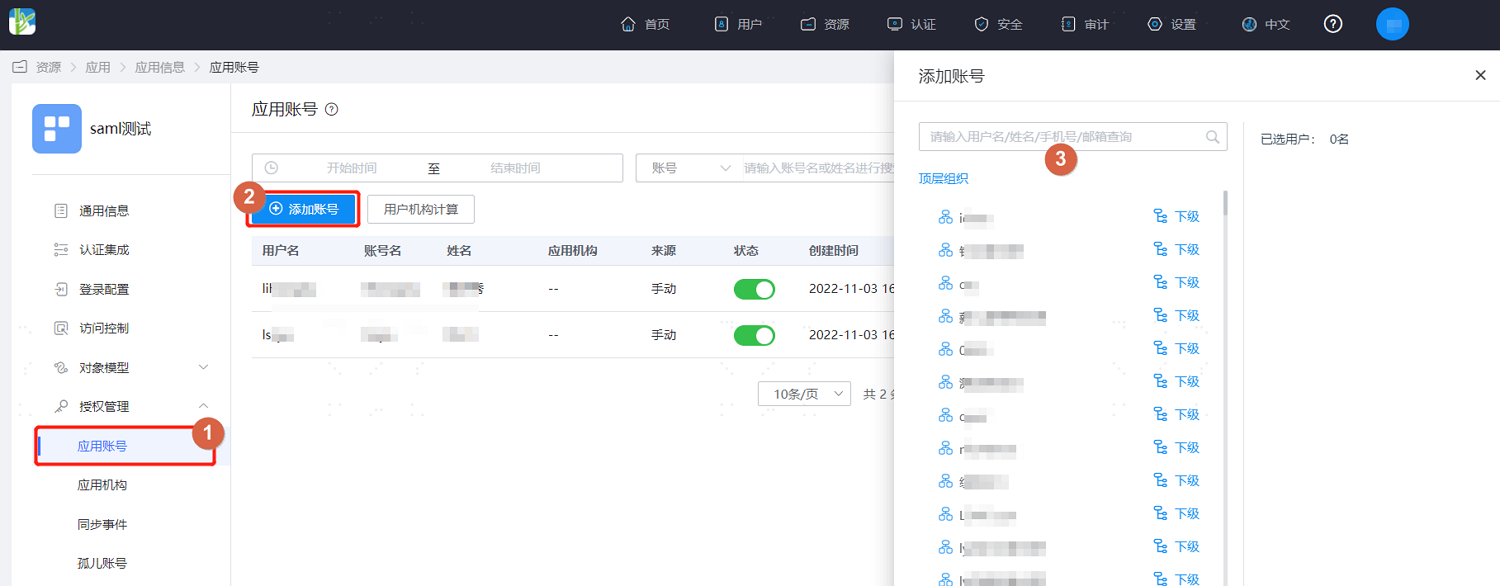
Click "Add Account" to assign access accounts for users under the specified organization to access this application.
Add User Accounts for Self-built Applications
Log in to the IDaaS enterprise center platform. In the top navigation bar, select "Resources > Applications". Under the self-built application category, find the application to which you want to authorize accounts, and click to enter it.
Find "Authorization Management", click "Authorize" after User-Based Authorization to enter the user-based authorization page. The page displays all accessible accounts under this application. Accounts are associated with users, and users can access the application with these accounts.
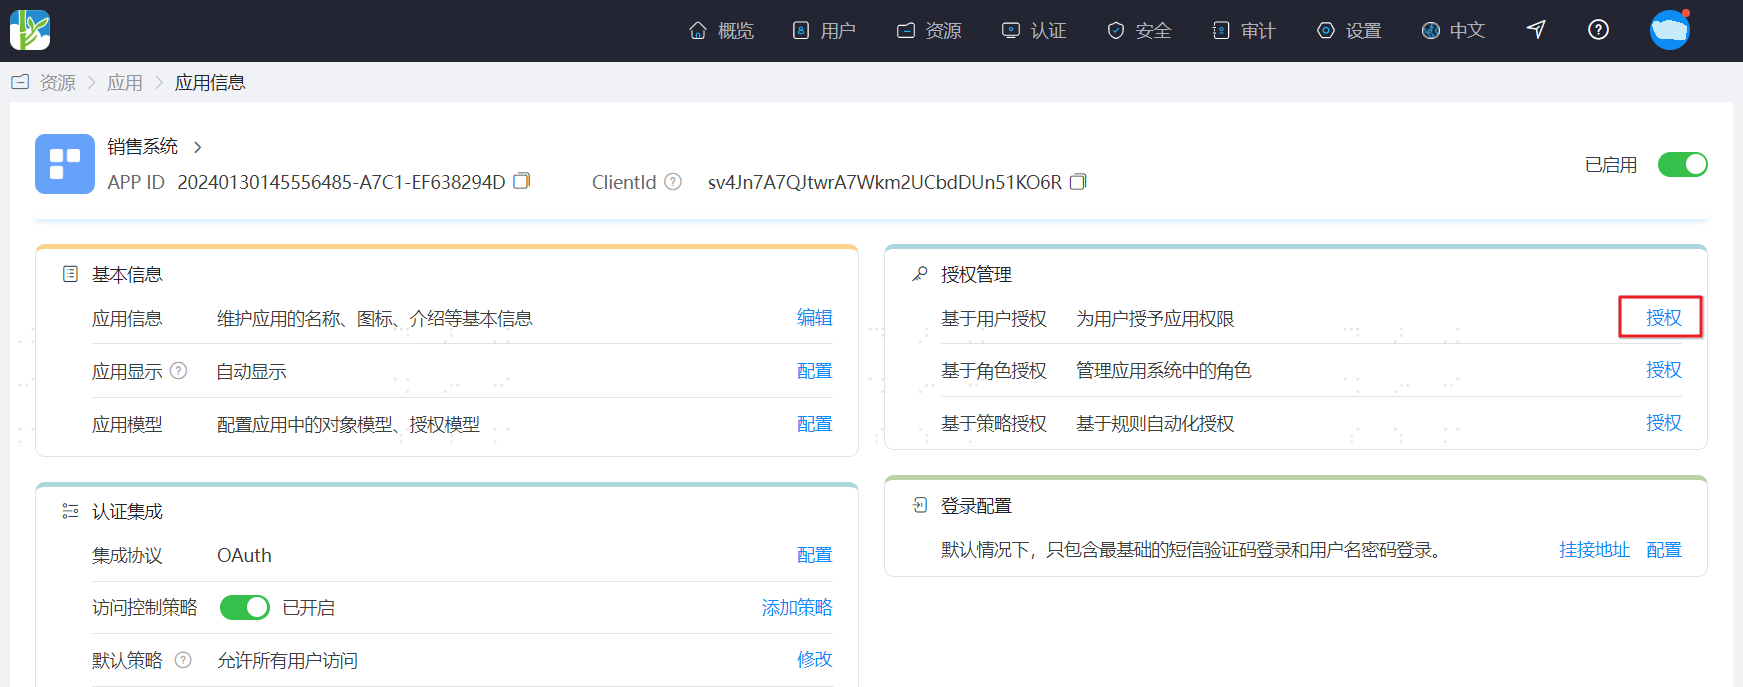
Click "Add User Authorization" to assign access accounts for users under the specified organization or user group to access this application, or directly search for users to assign access accounts.
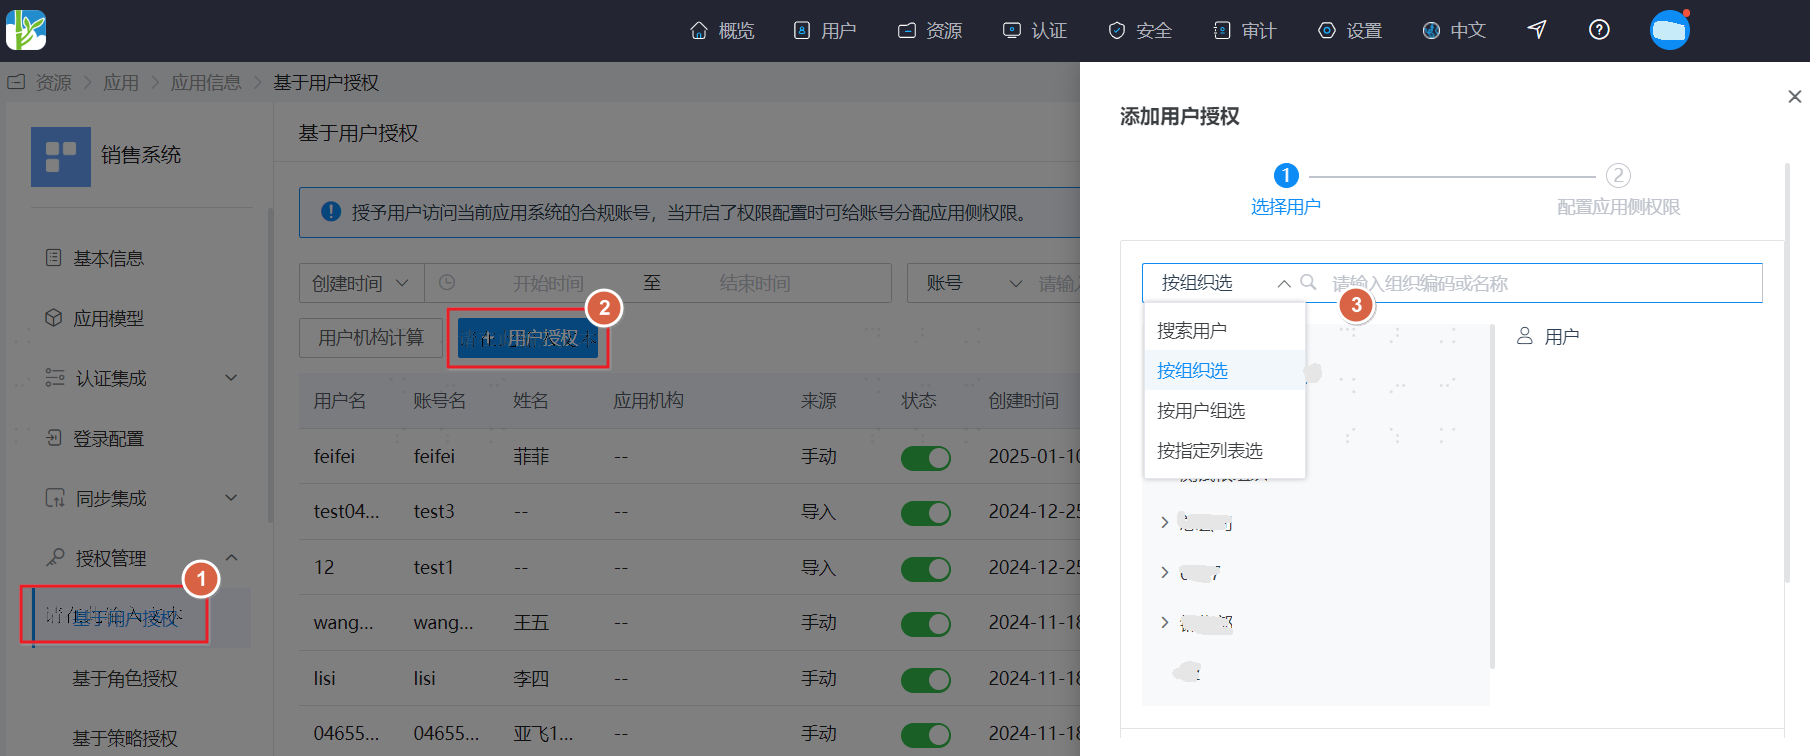
Automatic Authorization
This means automatically assigning access accounts to users when they meet certain rules.
Because self-built applications and pre-integrated applications have different interfaces, the procedures are described separately below.
Automatically Assign Application Accounts to Users in Pre-integrated Applications
Log in to the IDaaS enterprise center platform. In the top navigation bar, select "Resources > Applications". Under the pre-integrated application category, find the application to which you want to authorize accounts, and click to enter it.
Find "Authorization Management", click "Authorize" after Application Account to enter the application account page. The page displays all accessible accounts under this application. Accounts are associated with users, and users can access the application with these accounts.
Click "Authorization Policy" and enable the user automatic authorization button to automatically assign this application account to users. Configuration instructions are as follows.
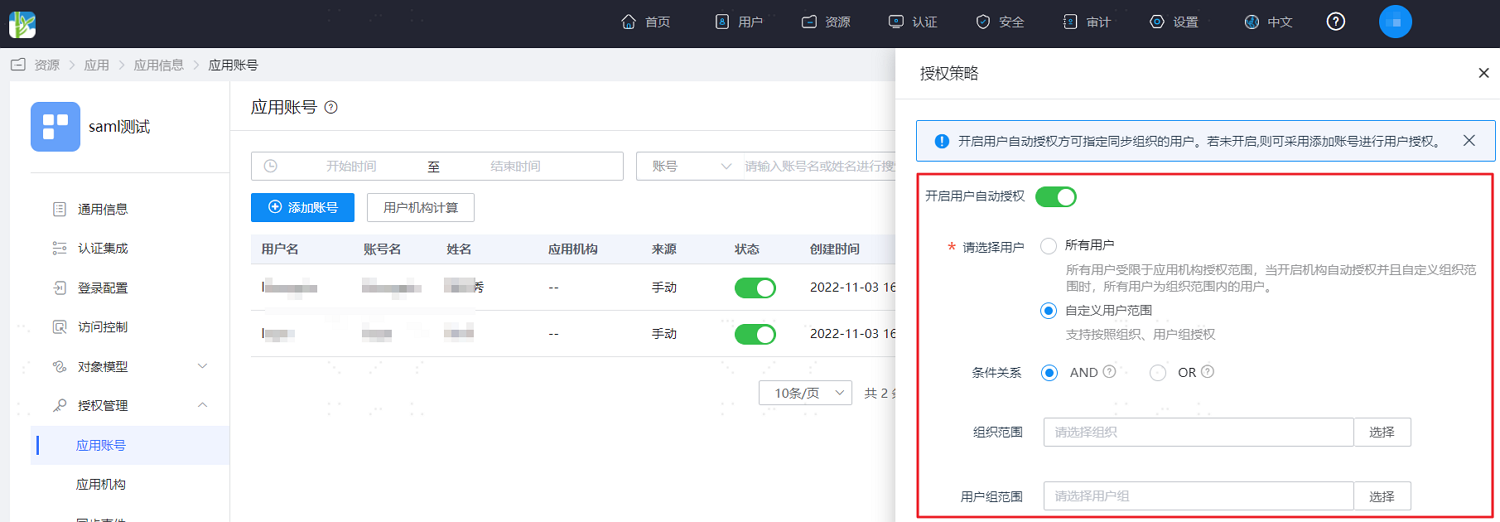
Select users: select the scope of users to whom this application account is automatically assigned.
- All users: means automatically assign this application account to all users on the platform. When organization automatic authorization is enabled and a custom organization scope is set, "All users" refers to users within the organization scope.
- Custom user scope: means automatically assign this application account to users under specified organizations or user groups.
- Condition relationship: the relationship between organization and user group conditions under automatic authorization.
- AND: means users must be within both the set organization scope and user group scope to be automatically assigned this application account.
- OR: means users only need to be within either the set organization scope or user group scope to be automatically assigned this application account; satisfying either one is sufficient.
- Organization scope: set the organization scope for automatic assignment of this application account.
- User group scope: set the user group scope for automatic assignment of this application account.
- Condition relationship: the relationship between organization and user group conditions under automatic authorization.
Automatically Assign Application Accounts to Users in Self-built Applications
Log in to the IDaaS enterprise center platform. In the top navigation bar, select "Resources > Applications". Under the self-built application category, find the application to which you want to authorize accounts, and click to enter it.
Find "Authorization Management", click "Authorize" after Policy-Based Authorization to enter the policy-based authorization page. The page displays authorization policies already configured for this application.
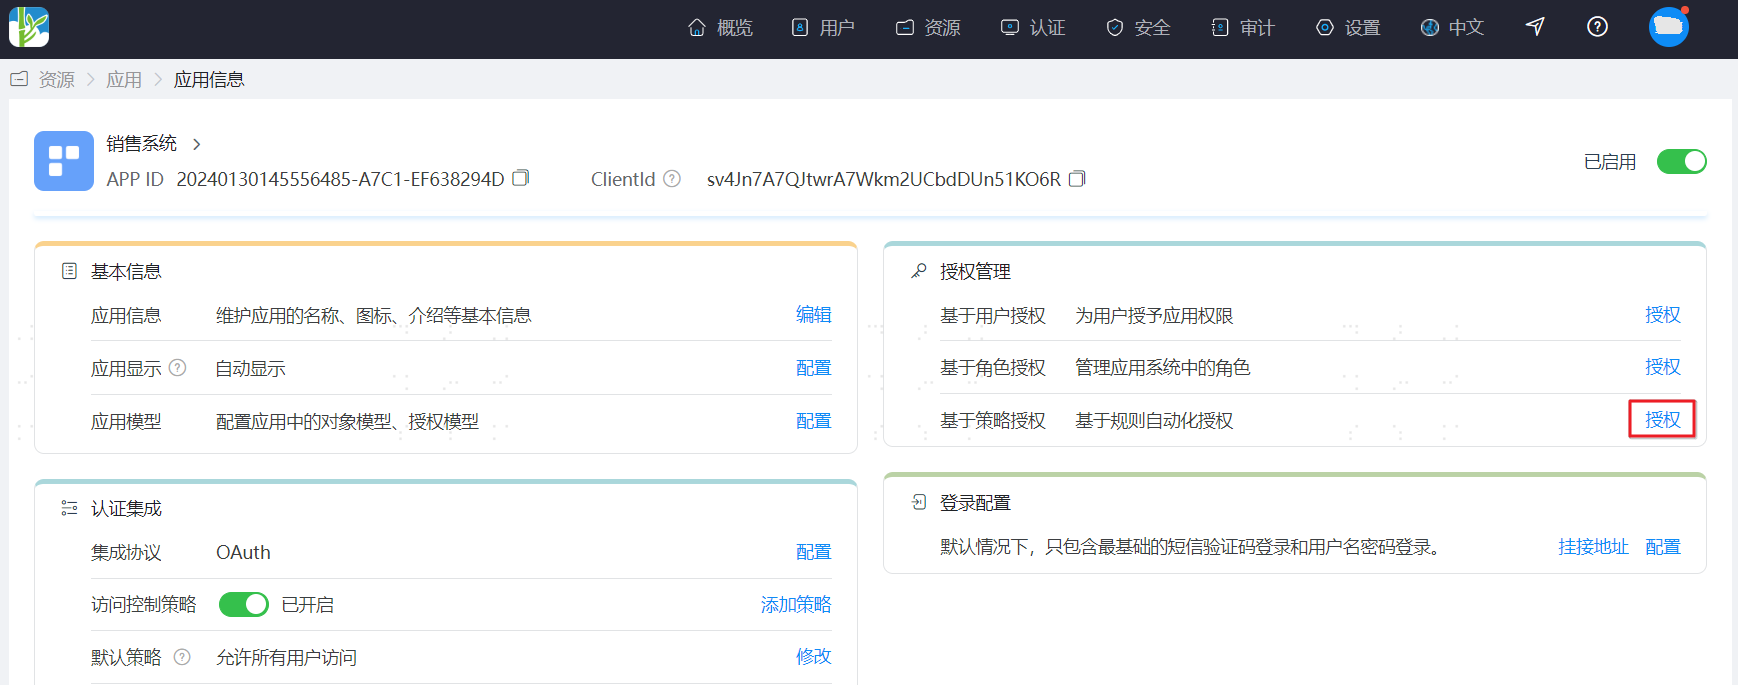
Click "Add Policy" to open the policy configuration page. Configuration instructions are as follows.
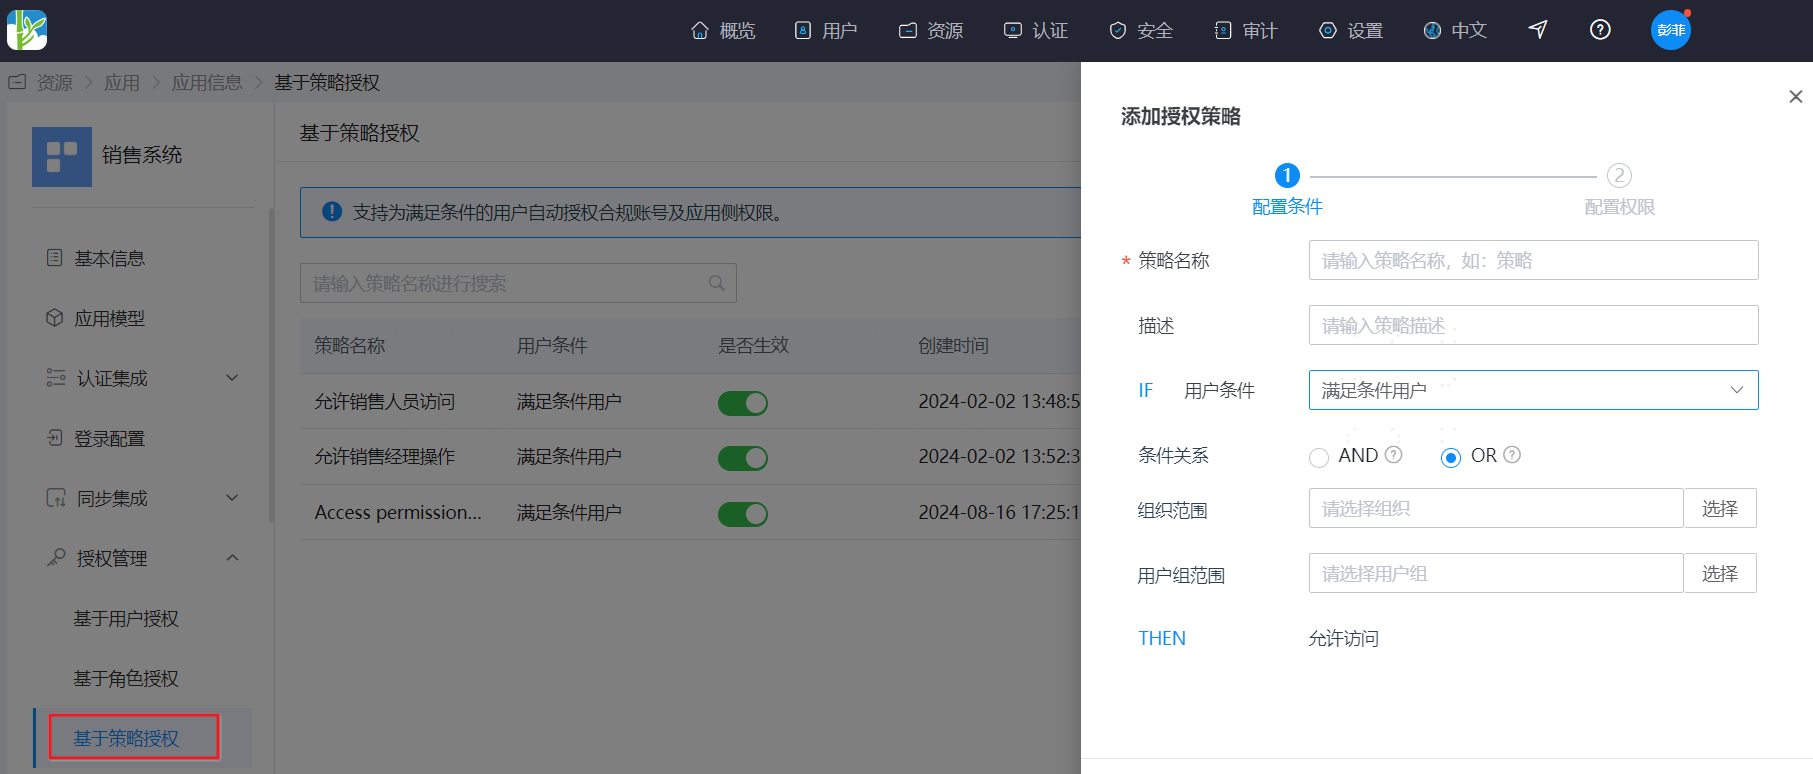
User conditions: select the scope of users to whom this application account is automatically assigned.
- All users: means automatically assign this application account to all users on the platform. When organization automatic authorization is enabled and a custom organization scope is set, "All users" refers to users within the organization scope.
- Custom user scope: means automatically assign this application account to users under specified organizations or user groups.
- Condition relationship: the relationship between organization and user group conditions under automatic authorization.
- AND: means users must be within both the set organization scope and user group scope to be automatically assigned this application account.
- OR: means users only need to be within either the set organization scope or user group scope to be automatically assigned this application account; satisfying either one is sufficient.
- Organization scope: set the organization scope for automatic assignment of this application account.
- User group scope: set the user group scope for automatic assignment of this application account.
- Condition relationship: the relationship between organization and user group conditions under automatic authorization.
Manage Orphan Accounts
Orphan accounts, also known as ghost accounts, are accounts in application systems that cannot be associated with specific individuals.
Log in to the IDaaS enterprise center platform. In the top navigation bar, select "Resources > Applications", and click to enter the application to which you want to authorize accounts.
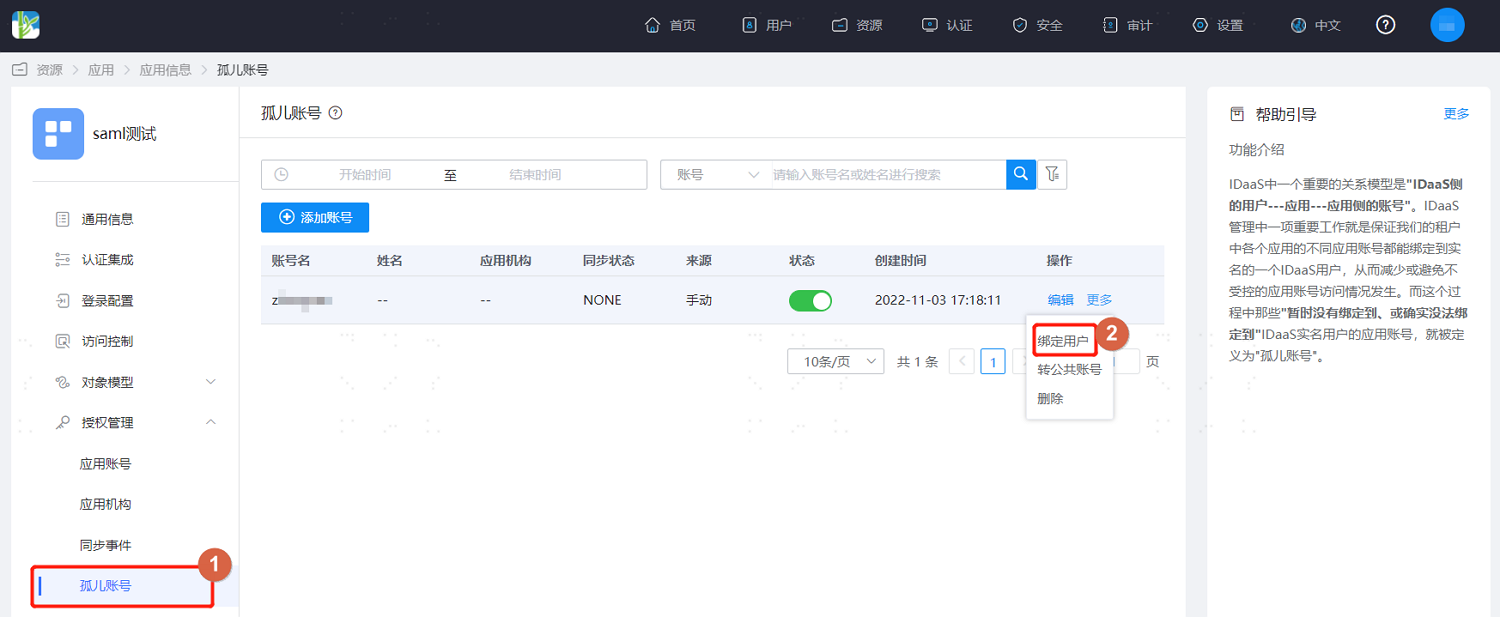
On the application details page, select "Orphan Accounts" on the left. This page displays accounts under this application that are not bound to users. You can manually add orphan accounts and click "More > Bind User" in the operation column of an orphan account to bind a user. After binding, the user can use this account to access the application system.
Manage Shared Accounts
Shared accounts refer to accounts in application systems that are associated with multiple people and used simultaneously by multiple people.
Log in to the IDaaS enterprise center platform. In the top navigation bar, select "Resources > Applications", and click to enter the application to which you want to authorize accounts.
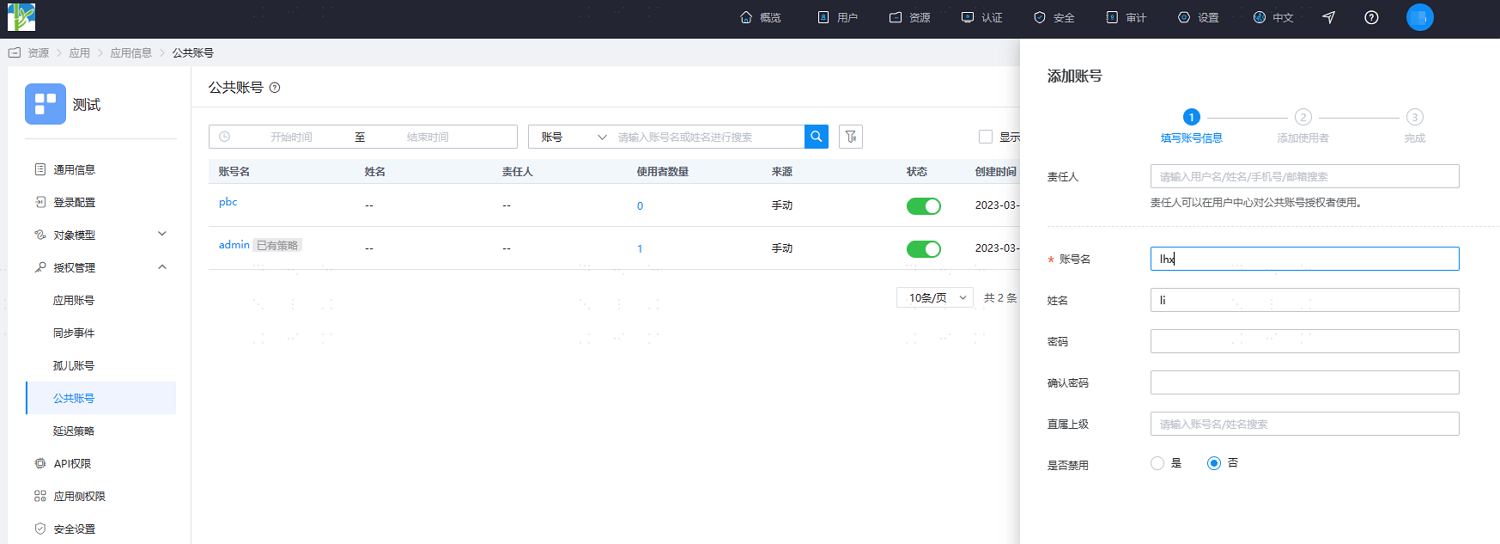
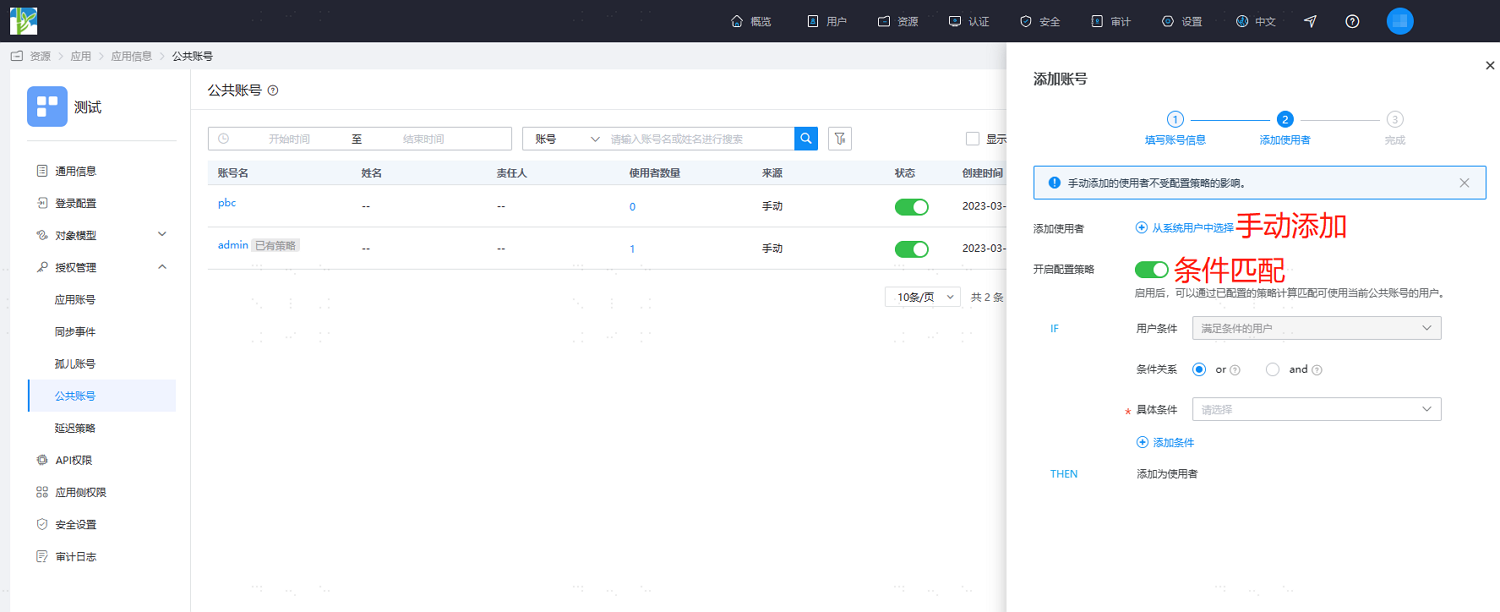
On the application details page, select "Shared Accounts" on the left. This page displays all shared accounts under this application. Click "More" in the operation column of a shared account to set users, responsible persons, and configure usage policies for the account. You can view users who can use this account through policy calculation.
Users: set users who can use this shared account to access the application. When a user has both a normal application account and shared account usage permission under their name, a pop-up will prompt the user to choose one identity to log in after logging in to the application system.
Responsible Person: set the responsible person for this shared account. The responsible person can manage the shared account. Users can view shared accounts under their management in the user center and perform maintenance operations.
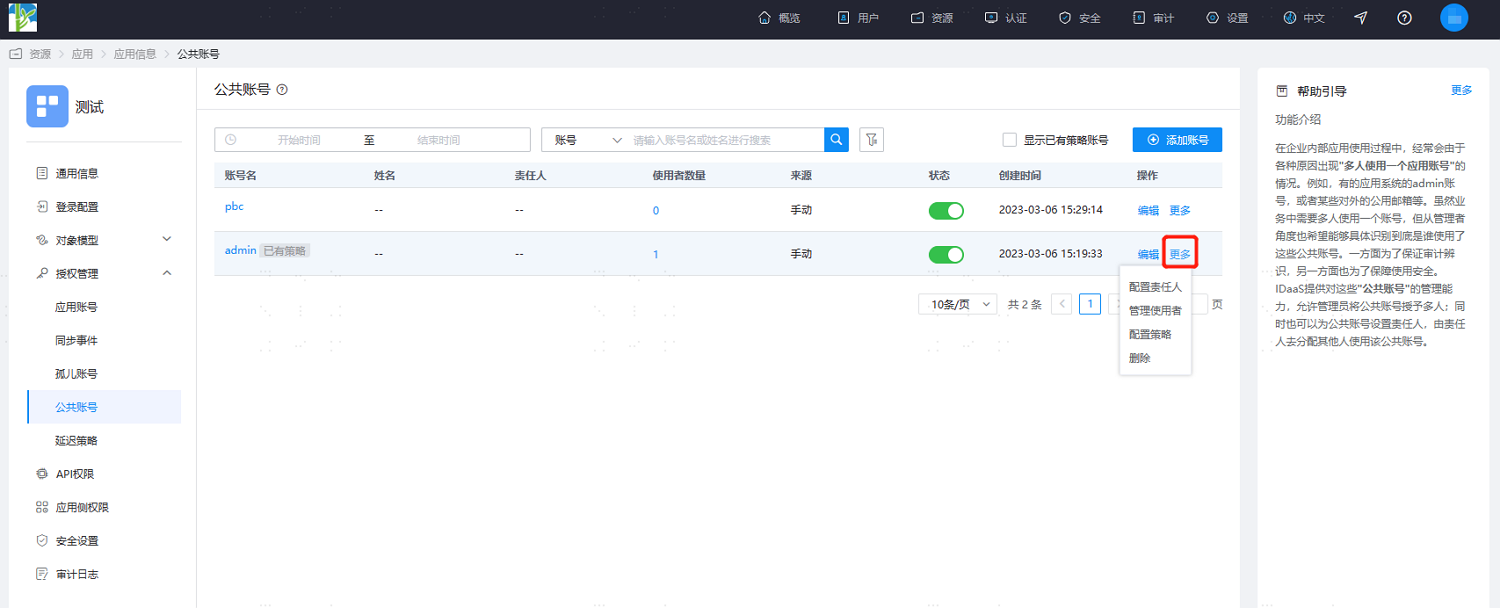
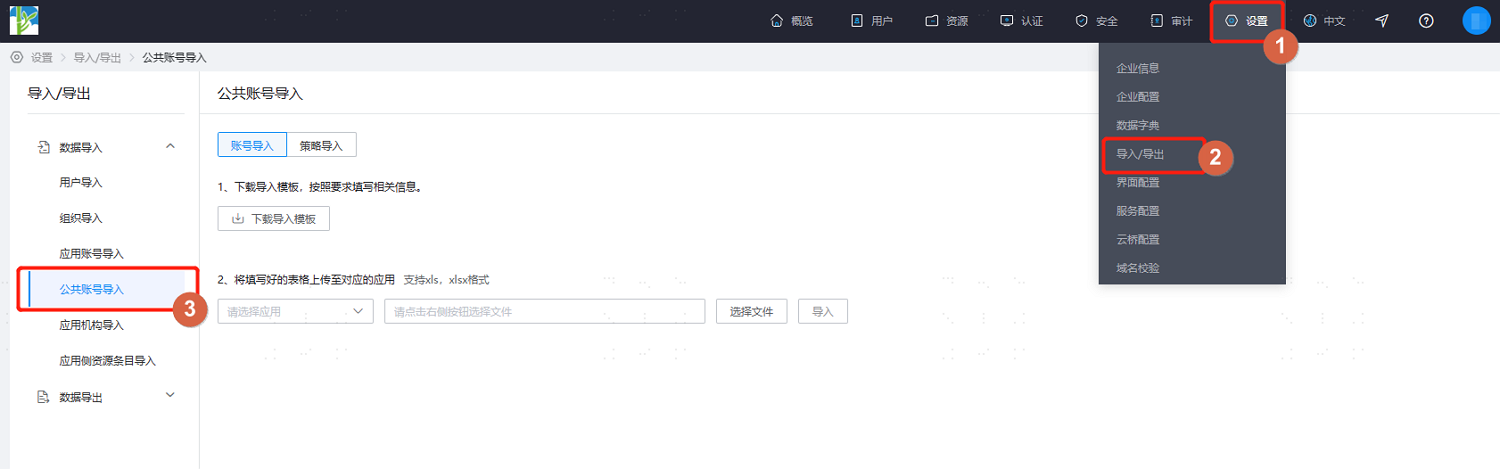
Click "Add Account" in the upper-right corner to manually add a shared account, set basic information such as account name and password, and manually add responsible persons/users or automatically add users by configuring policies. You can also import shared accounts and shared account policies from local on the "Settings > Import/Export" page. Users who meet the account policy are automatically assigned as shared account users.