
AWS China Cognito Identity Pool
Overview
The AWS Cognito User Pool is not yet available in China. BambooCloud IDaaS can fully replace the Cognito User Pool. By leveraging BambooCloud for user identity verification and integrating with the Cognito Identity Pool, seamless and secure access to AWS resources can be achieved.
This article describes how to use BambooCloud IDaaS OpenID Connect protocol as an alternative to the Cognito User Pool. We will prepare a JavaScript demo example, which you can customize according to your needs. This example mainly demonstrates BambooCloud IDaaS as the identity provider, allowing users to log in with their BambooCloud IDaaS username and password to obtain Cognito tokens.
Terminology
Cognito User Pool: The Cognito User Pool is responsible for authentication. End users can complete the registration and login process through the user pool.
Cognito Identity Pool: The Cognito Identity Pool is responsible for authorization (access control), granting end users the right to use AWS resources.
BambooCloud IDaaS: Based on a cloud-native identity cloud service platform, it can replace the Cognito User Pool and build a bridge between China users and AWS resources. Hereinafter referred to as BambooCloud IDaaS or the platform.
Authentication Flow
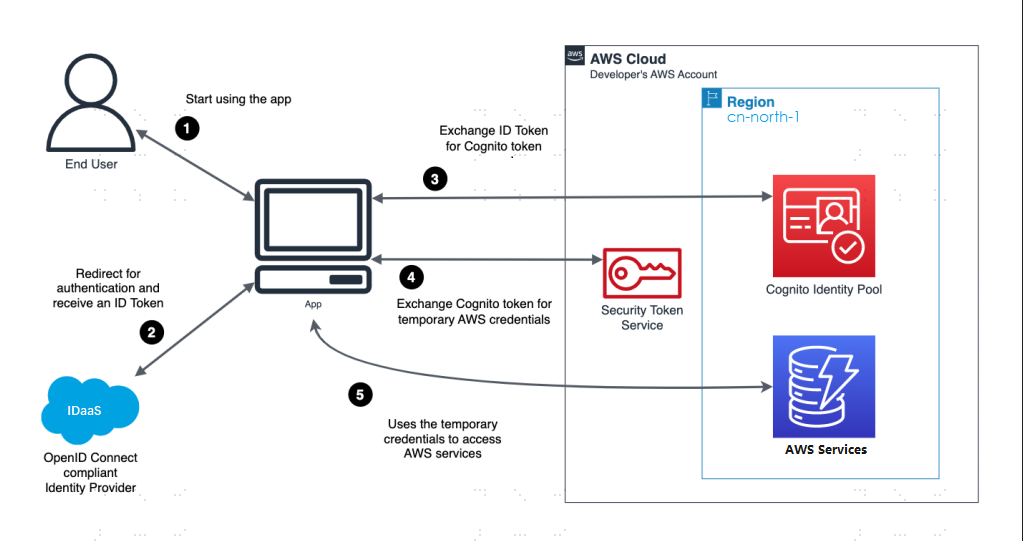
Flow Description
The user accesses the demo example and clicks the "Login with BambooCloud IDaaS" button.
The demo example redirects the user to BambooCloud IDaaS for login. After successful verification, the demo example receives the ID Token from BambooCloud IDaaS.
The demo example exchanges the ID Token for a Cognito token.
The demo example exchanges the Cognito token for temporary AWS security credentials.
The demo example uses the credentials to access AWS services.
Prerequisites
- AWS account. If you don't have one, you can get started with AWS for free.
- A web server for hosting the demo example.
BambooCloud IDaaS Configuration
Log in to the BambooCloud IDaaS Enterprise Center Resources > Applications > Add Self-built Application. The application name can be Cognito OIDC Example, and select OIDC for authentication integration.
Configure application authentication parameters.
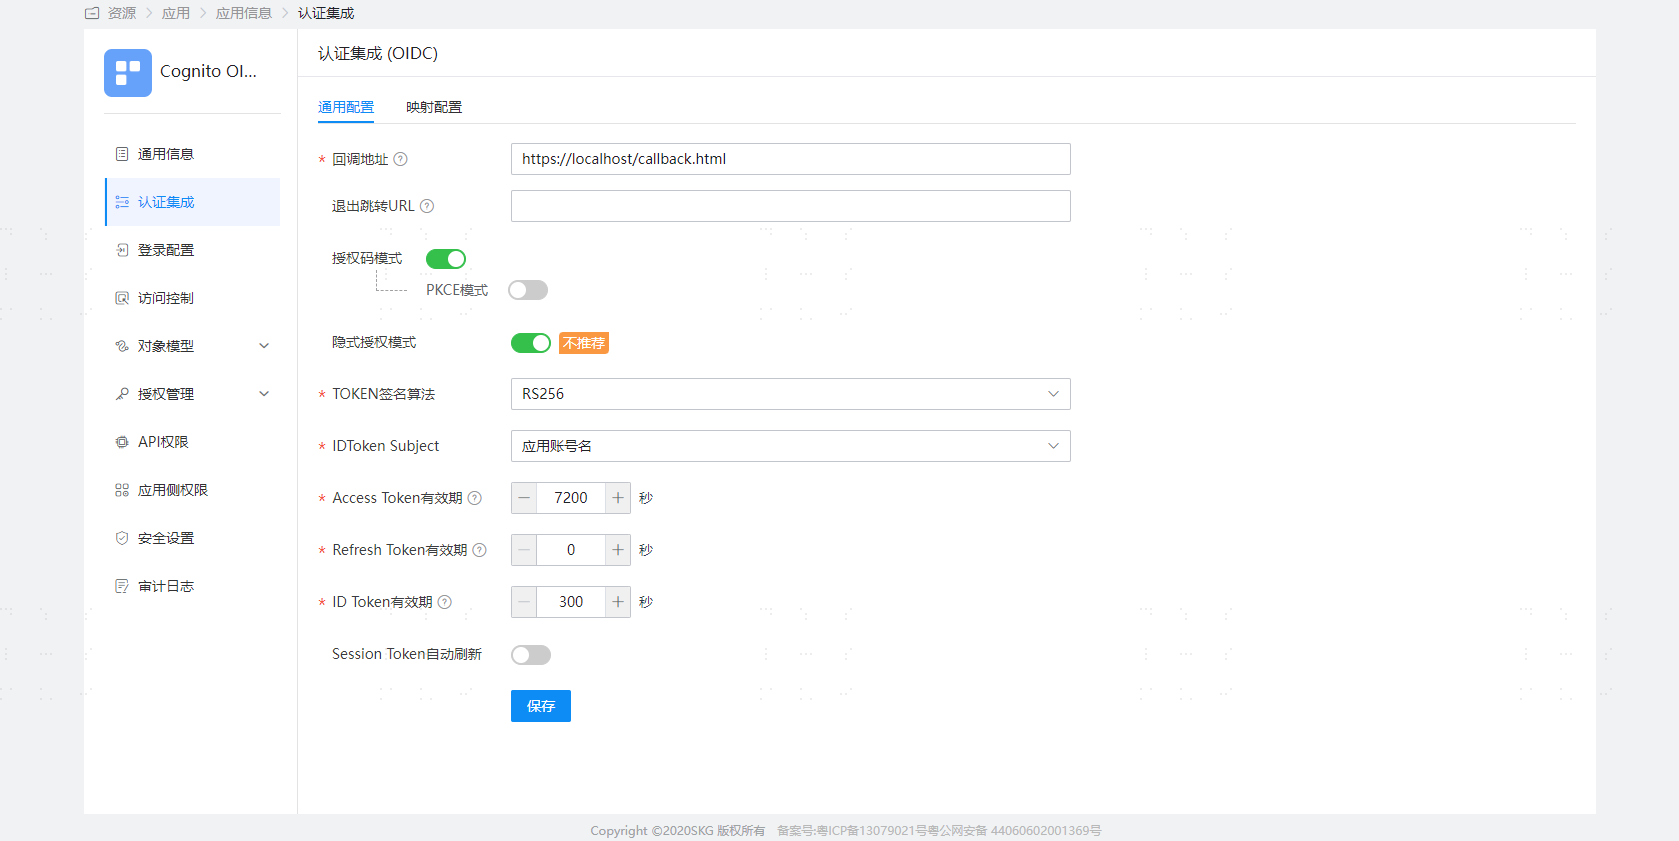
- Callback address: Please specify the path of the Callback.html file on the web server. Example: https://localhost/callback
- Implicit authorization mode: This demo example needs to enable implicit authorization mode. If your application is a backend integration with BambooCloud IDaaS, you can also choose to disable implicit authorization mode and use authorization code mode to obtain the ID Token through the authorization code for use in the demo to exchange the Cognito token.
Please remember the BambooCloud IDaaS application ClientId, which we will provide to AWS as the "audience" of the OpenId Connect identity provider.
- In the left menu bar of the application, switch to Authorization Management > Application Account tab and add an account.
AWS IAM Configuration
Log in to the AWS Console.
In "All services", select Identity and Access Management (IAM).
Select Identity Providers.
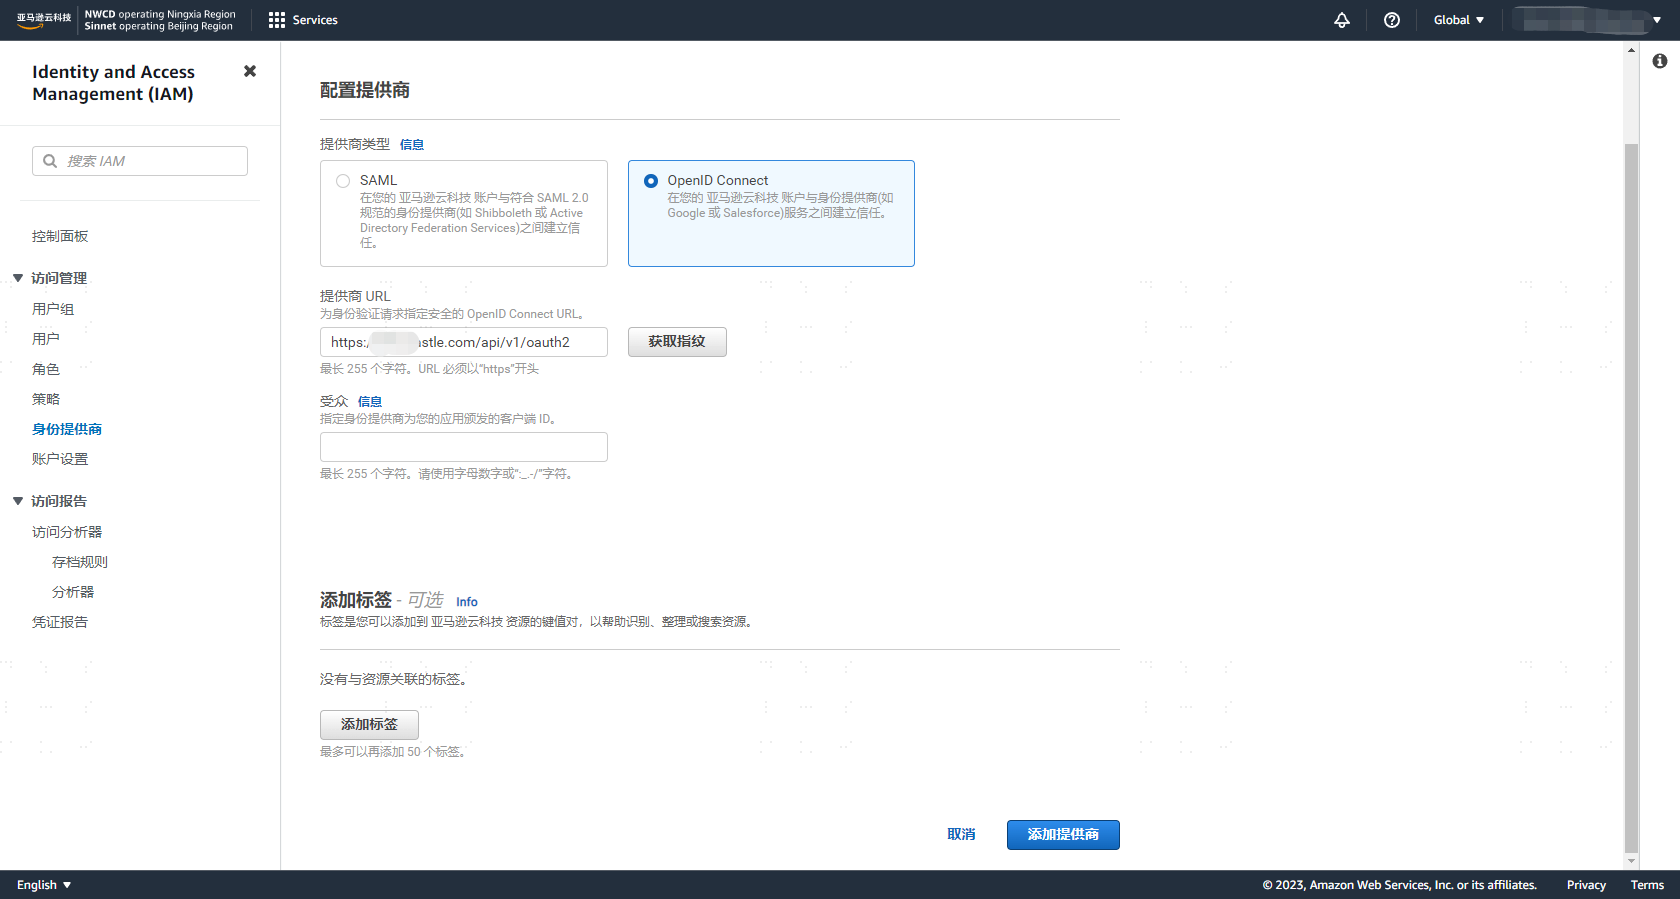
Click Add Provider and select OpenID Connect.
Fill in "Provider URL": Example: https://{yourdomain}/api/v1/oauth2, replace yourdomain in the example with your BambooCloud IDaaS domain name, and click Get thumbprint.
Fill in "Audience": Your BambooCloud IDaaS application ClientId, which is the application you created in the BambooCloud IDaaS platform in the previous step, and save successfully.
Please remember your provider name, because we will need it when creating the demo example later. Example: {yourdomain}/api/v1/oauth2
AWS Cognito Configuration
Log in to the AWS Console.
In "All services", select Cognito.
Select your identity pool. If there is no identity pool, please "Create identity pool".
Configure identity pool trust, select identity source: OpenID Connect (OIDC), and click "Next".
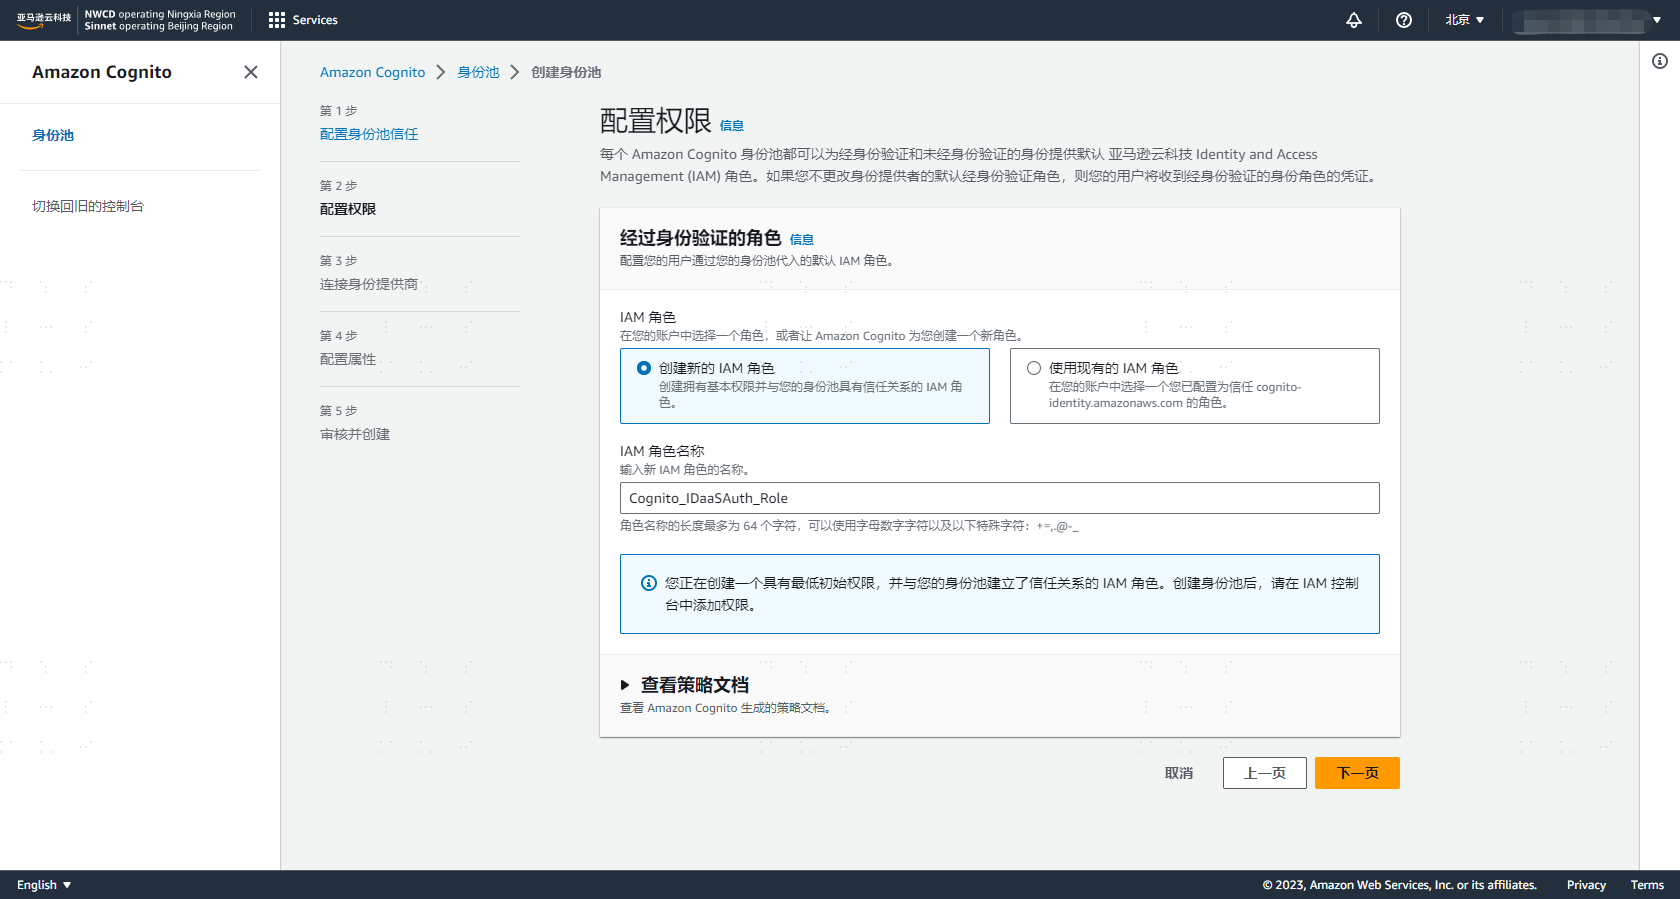
Create an IAM role name, example: Cognito_BambooCloudIDaaSAuth_Role. You can view the policy details. Cognito automatically adds the GetCredentialsForIdentity permission.
    {
        "Effect": "Allow",
        "Action": [
            "cognito-identity:GetCredentialsForIdentity"
        ],
        "Resource": [
            "*"
        ]
}- Select the identity provider you created earlier and click Save.
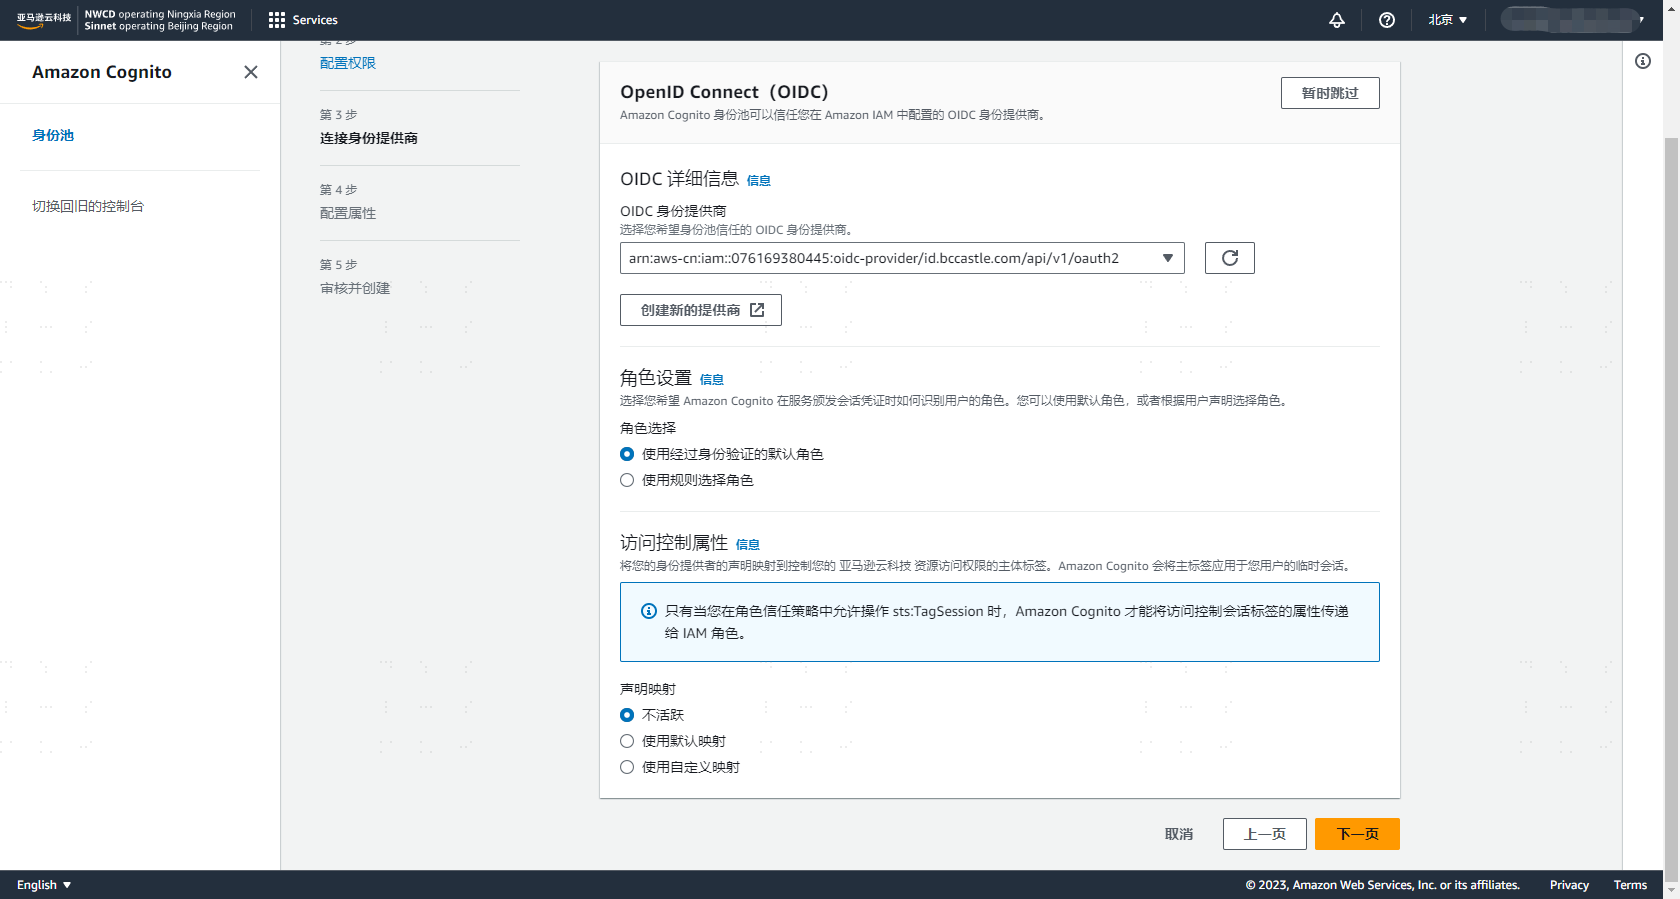
Please remember the identity pool ID, because we will need it when creating the demo example later.
Create Demo Program
- The demo example only contains two files — index.html and callback.html. In this section, I will show the complete code listings of these two files. Next, you only need to update three variables in the files respectively, and then deploy them to your server.
index.html
The index.html file displays the "Login with BambooCloud IDaaS" button and redirects the user to BambooCloud IDaaS for authentication. This file is the starting point of the demo example. It needs to configure your application's ClientId, which is how BambooCloud IDaaS knows which demo example the login request comes from.
The complete markup and code of index.html are listed below. You also need the following three steps:
Replace the client_id in the JavaScript code with your ClientId, which is the BambooCloud IDaaS application ClientId obtained in [BambooCloud IDaaS Configuration].
Replace the redirect_uri in the JavaScript code with the address of your demo example's callback.html.
Replace yourdomain in the url in the JavaScript code with your domain name, which is the BambooCloud IDaaS domain name.
<!DOCTYPE html>
<html>
<head>
    <title>IDaaS Cognito OIDC Example</title>
</head>
<body>
    <h2>IDaaS and Amazon Cognito OpenID Integration Example</h2>
    <p>
		This demo demonstrates a web application example of how IDaaS integrates with Amazon Cognito through OIDC. The example allows users to log in with their IDaaS username and password and obtain Cognito tokens.
    </p>
    <p>This demo is entirely written in JavaScript and only contains two files - <b>index.html</b> and <b>callback.html</b>.</p>
    <p>First, please click <b><button onclick="login()">Login with IDaaS Demo</button></b>. If authentication is successful, we will redirect to <b>callback.html</b> and successfully display the Cognito token.</p>
</body>
<script type="text/javascript">

function login() {
    // Replace with IDaaS application ClientId
    var client_id = 'yeMSd6WRMnNoVXXXXXXncXLV9l2jXZ';

    // Replace with callback.html address
    var redirect_uri = 'https://localhost/callback';

    // Replace yourdomain in url with your domain name, i.e., IDaaS domain name
    var url = 'https://{yourdomain}/api/v1/oauth2/authorize'
        + '?response_type=token id_token'
        + '&scope=openid'
        + '&nonce=abc'
        + '&client_id=' + client_id
        + '&redirect_uri=' + redirect_uri;
    window.location.replace(url);
}
</script>
</html>
callback.html
callback.html is the page the user sees when BambooCloud IDaaS redirects them to the demo example after login.
The complete markup and code of callback.html are listed below. You also need the following three steps:
Replace aws_region in the JavaScript code with your Cognito user pool region.
Replace yourdomain in provider_url in the JavaScript code with your domain name, which is the provider name obtained in [AWS IAM Configuration].
Replace pool_id in the JavaScript code with your identity pool ID, which is the identity pool ID obtained in [AWS Cognito Configuration].
<!DOCTYPE html>
<html>
<head>
    <title>IDaaS Cognito OIDC Example</title>
    <script src="https://sdk.amazonaws.com/js/aws-sdk-2.850.0.min.js"></script>
</head>
<body onload="callback()">
    <h2>IDaaS and Amazon Cognito OpenID Integration Example</h2>
	<h4></h4>
	<h4></h4>
	<h4></h4>
	<h4></h4>
	<h4></h4>
	<h4></h4>
</body>
<script type="text/javascript">
	function callback() {
        var url = window.location.href;
        var error = url.match('error=([^&]*)')
        if (error) {
            var description = url.match('error_description=([^&]*)')
            printMessage('Error', 'Error: ' + error[1] + '

Description: ' + description[1] + '</br>');
            return;
        }
        var match = url.match('id_token=([^&]*)');
        if (match) {
            var id_token = match[1];
            if (id_token) {
                printMessage('Error', 'Use IDaaS ID Token to obtain Cognito token');
                makeCognitoRequest(id_token);
            }else{
                printMessage('Error', 'Error: Unable to retrieve id token from URL');
            }
        }else{
            printMessage('Error', 'Error: No id token in URL');
        }
    }
    async function makeCognitoRequest(id_token) {
	    // Replace aws_region with your Cognito user pool region
        var aws_region = 'cn-north-1';
		// Replace yourdomain in provider_url with your domain name
        var provider_url = '{yourdomain}/api/v1/oauth2';
		// Replace pool_id with your identity pool ID
        var pool_id = 'cn-north-1:469392b9-XXXX-XXXX-9877-7d34c3ca2a47';
        var logins = {};
        logins[provider_url] = id_token;
        AWS.config.region = aws_region;

        try {
			const cognitoIdentity = new AWS.CognitoIdentity();
            const { IdentityId } = await cognitoIdentity.getId({
				IdentityPoolId: pool_id,
				Logins: logins
			}).promise()
            const { Credentials } = await cognitoIdentity.getCredentialsForIdentity({
				IdentityId: IdentityId,
				Logins: logins
			}).promise()
            printMessage('IdentityId', 'IdentityId: '  + IdentityId);
            printMessage('AccessKeyId','AccessKeyId: '  + Credentials.AccessKeyId);
            printMessage('SecretKey','SecretKey: '  + Credentials.SecretKey);
            printMessage('SessionToken','SessionToken: '  + Credentials.SessionToken);
            printMessage('Expiration','Expiration: '  + Credentials.Expiration);
        } catch (e) {
            printMessage('Error', e);
        }
    }
    function printMessage(elementId, messageString){
       document.getElementById(elementId).innerHTML = messageString;
    }
</script>
</html>
Login Verification
Now everything is ready, you can test the demo example.
On the index.html page, click Login with BambooCloud IDaaS Demo.

Log in with your BambooCloud IDaaS username and password.
After successful login, you will be redirected to the callback.html page. You will see the following AWS temporary credentials.
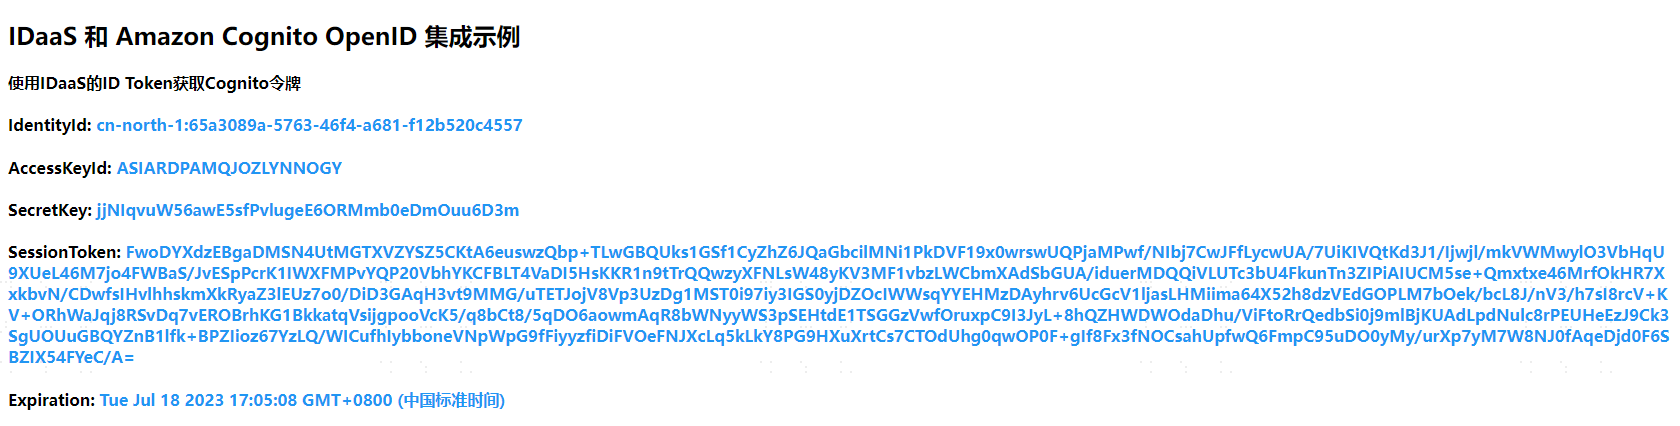
Use the AWS temporary credentials to access AWS services, such as API Gateway, S3, IoT, AI, and other services.